Last updated at Thu, 11 Nov 2021 19:00:00 GMT
The first 3 installments of our series on Rapid7's hands-on exercise from the IoT Village at this year's DefCon covered how to set up a UART header, how to determine UART status and baud rate, and how to log into single-user mode on the device. In this final post, we'll discuss how to gain full root access and successfully complete this exercise in IoT hacking.
Mount rootfs_data and configure user accounts
Once you're logged on in single-user mode (root), I recommend taking a quick look at a few other things that are interesting. For example, look at the partition layout on the flash chips. This can be done by running cat against /proc/mtd. (MTD stands for Memory Technology Devices.) Enter the command "cat /proc/mtd" and hit enter. This should return the list of MTDs (Figure 25), which list their dev number, size, and names.
As you can see, there are a couple of partitions that appear to have similar names, such as “kernel" and “kernel1," as well as “ubi_rootfs" and “ubi_rootfs1." The purpose of having duplicate file system partitions is to allow system firmware updates without potentially bricking the device if there were issues during the update process, such as a power failure. During normal operation, one of these partition pairs is online, while the others are offline. So, when a firmware update is done, the offline partitions are updated and then placed online, and the others are taken offline during a system reboot. If there is a failure during the update process, the system can safely roll back to the partition pair that was not corrupted.
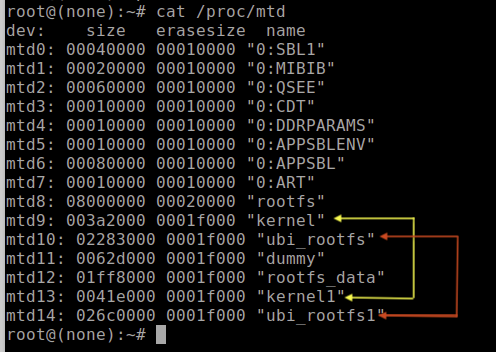
To gain full running root access on the LUMA, we're interested in the rootfs_data partition file system (Figure 26).

This file system “rootfs_data" is used to hold the dynamically configurable system data and user configuration information, which is typically removed if you do a factory reset on the device. This data partition filesystem is typically on all IoT devices but often has different names.
Earlier in this blog series, while reviewing the captured UART console logs, we made note of what UBIFS device number and volume number this partition was mounted on. With that information, our next step will be to mount the rootfs_data partition and create a shadow and passwd file with account information, so when we reboot the system, we'll be able to gain full root access on a fully operational device. To make this happen, the first step is to create a writable directory that we can mount this file system to. The best place for doing this on an IoT device will always be the /tmp folder, which is a temporary location in RAM and is always read/writable.
To accomplish this, I typically change directory to /tmp and create a folder for a mount point on the device using the following commands:
- cd /tmp
- mkdir ubifs
Now, use the correct UBIFS device number and volume number we observed in the boot logs:
device 0, volume 2 = /dev/ubi0_2
device 0, volume 3 = /dev/ubi0_3
Enter the following command corrected to either (/dev/ubi0_2 or /dev/ubi0_3) to mount the partition to the mount point you created at /tmp/ubifs:
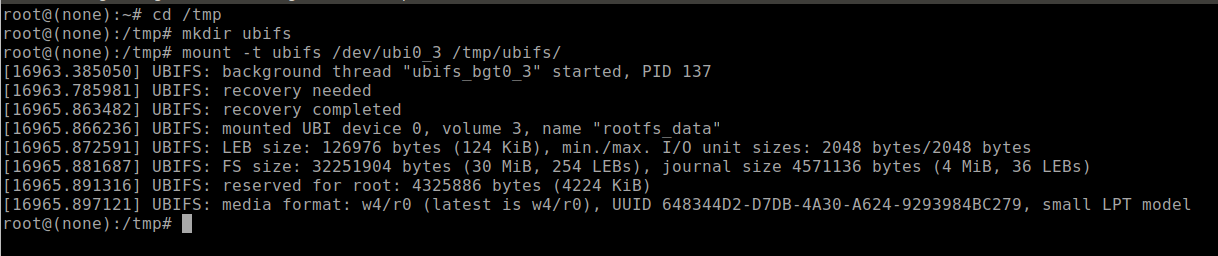
- mount -t ubifs /dev/ubi0_3 /tmp/ubifs/
This command should return results that look similar to Figure 27 without any errors. The only time I have encountered errors was when the rootfs_data volume was corrupted. I was able to correct that by conducting a factory reset on the device and starting over.
If successful, you should be able to change directory to this mounted volume and list the files and folders using the following commands:
- cd /tmp/ubifs
- ls -al
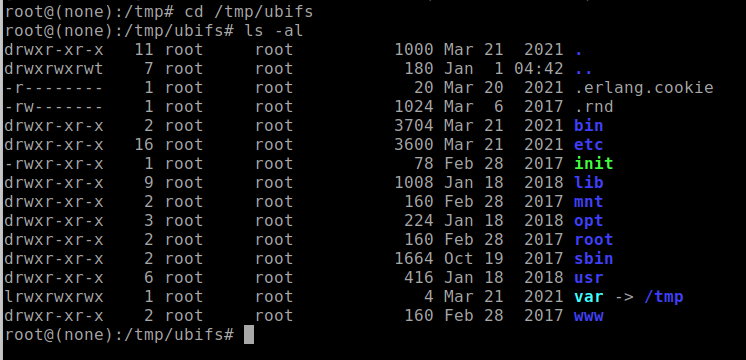
If the partition was properly mounted, you should see folders and files within the mount point that may look similar to the example shown in Figure 28. Also note that if the device has been factory reset, it may show far fewer folders and files. Although, with the LUMA device, it should at least show the /etc folder.
Once you've mounted the rootfs_data volume, the next step is to change the directory to the “/tmp/ubifs/etc" folder and create and/or alter the passwd and shadow file to add an account to allow root access privileges. You can do this by entering the following commands, which will create a root account with the username of defcon with a blank password, which we used for the Defcon IoT Village exercises.
- cd /tmp/ubifs/etc/
- echo “defcon:::0:99999:7:::" > /tmp/ubifs/etc/shadow
- echo “defcon:x:0:0:root:/root:/bin/ash" > /tmp/ubifs/etc/passwd

The reason why this works is the data volume — in this case, rootfs_data — contains all dynamic configurations and settings for the device, so anything typically added to this volume will take precedence over any setting on the core root filesystem.
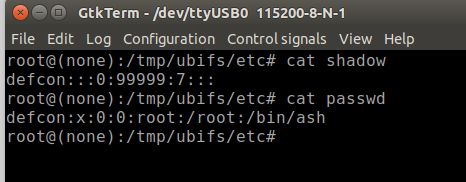
As a quick check to make sure everything was done correctly, run the following commands, and make sure the shadow and passwd file were created and the contents are correct.
- cat shadow
- cat passwd
If correct, the output should look like the following example in Figure 30:
Reboot and log in
If everything looks good, you're ready to reboot the system and gain full root access. To reboot the system, you can just enter "reboot" on the UART console or power cycle the device.
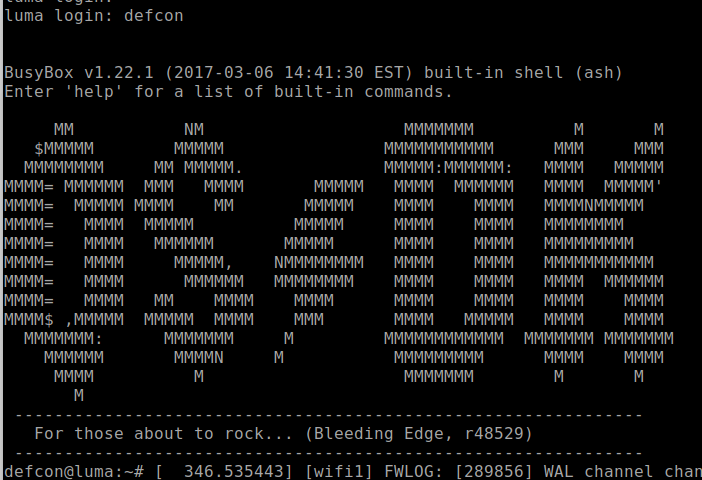
Once the system appears to be close to being booted, a good indication on LUMA is seeing the message “Please press Enter to activate this console" in the console. You can then hit the return key to see a login prompt. There may be a lot of log message noise in the console, but you can still enter the configured username defcon that was created during the creation of the shadow and passwd file, followed by the enter key. If everything was configured correctly, you should login without the need of a password as shown in Figure 31:
If this fails and you're prompted for a password, the most common cause is that you entered the commands to create the “passwd" and “shadow" files incorrectly. If you logged in, then you're now fully authenticated as root, and the system should be in the full operational mode. Also, it's not uncommon to see a lot of output messages to the UART console, which can be a pain and prevent you from easily interacting with the console. To get around this issue, you can temporarily disable most of the messages. Try entering the following command to make it a little quieter:
- dmesg -n 1
Once you've run that command, it should be much easier to see what's going on. At this point, you can interact with the system as root. For example, by running the commands below, you can see running processes and show current network open ports and connections.
- ps -ef “ List the processes running on the system"
- netstat -an “ Shows UDP/TCP ports and connection"
I often get asked during this exercise, “What do we gain from getting this level of root access to an IoT device?" I think the best answer is that this level of access allows us to do more advanced and detailed security testing on a device. This is not as easily done when setting on the outside of the IoT devices or attempting to emulate on some virtual machine, because often, the original hardware contains components and features that are difficult to emulate. With root-level access, we can interact more directly with running services and applications and better monitor the results of any testing we may be conducting.