Last updated at Tue, 14 Jul 2020 16:13:22 GMT
This blog post is part three of our three-part series on macro authentication. Be sure to catch up on part one and part two before reading, as this blog post will discuss advanced troubleshooting techniques and assume knowledge from the first two.
In our previous post, we discussed the various types of error messages and basic troubleshooting steps to take if you see those error messages in your event logs. In this use case, we will focus specifically on the “Error executing macro” error message. We had also discussed how increasing the duration of each macro event could help with making sure the macro spent enough time on executing each macro event so that elements that may take time to expose themselves are seen, and the macro event succeeds.
But, what happens if increasing the <Duration>XXXX</Duration> element did not help and your macro is still failing at a particular step? In this case, we can consider using custom Javascript to execute that specific event. Let’s review this with our sample application, WebScanTest. (we will be using a Chrome browser to do the following steps)
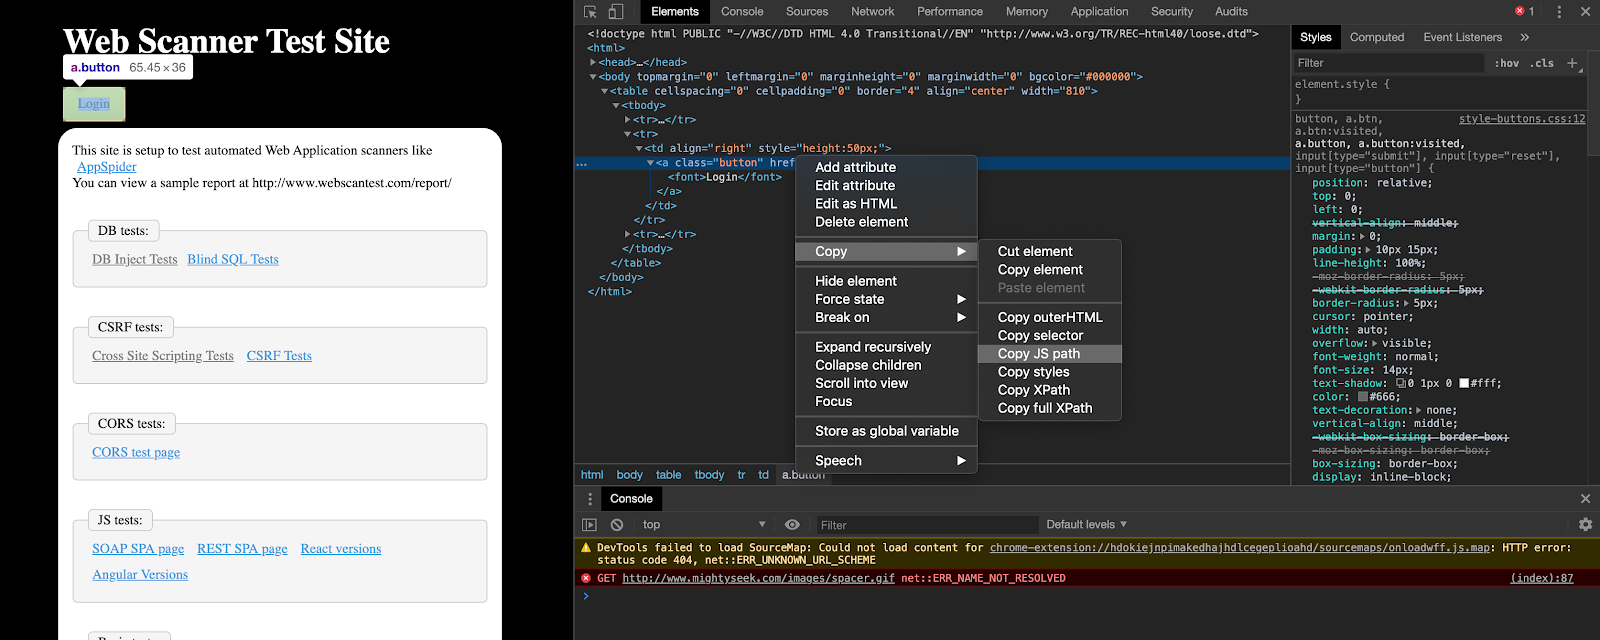
- Browse to WebScanTest and inspect element for our login step by clicking on the Login button on the first page. (We are troubleshooting the same error message on “Error executing macro … error in step 3: Could not find element ...” as discussed in part two.)
- Go ahead and find the highlighted element in the Elements tab and click on Copy->Copy JS path.
3. In the console section below, you can paste the JS path that we just copied and add “.click()” ahead of it. We are adding a “.click()”, as we know that the operation to get to the next page is to click on the Login button.
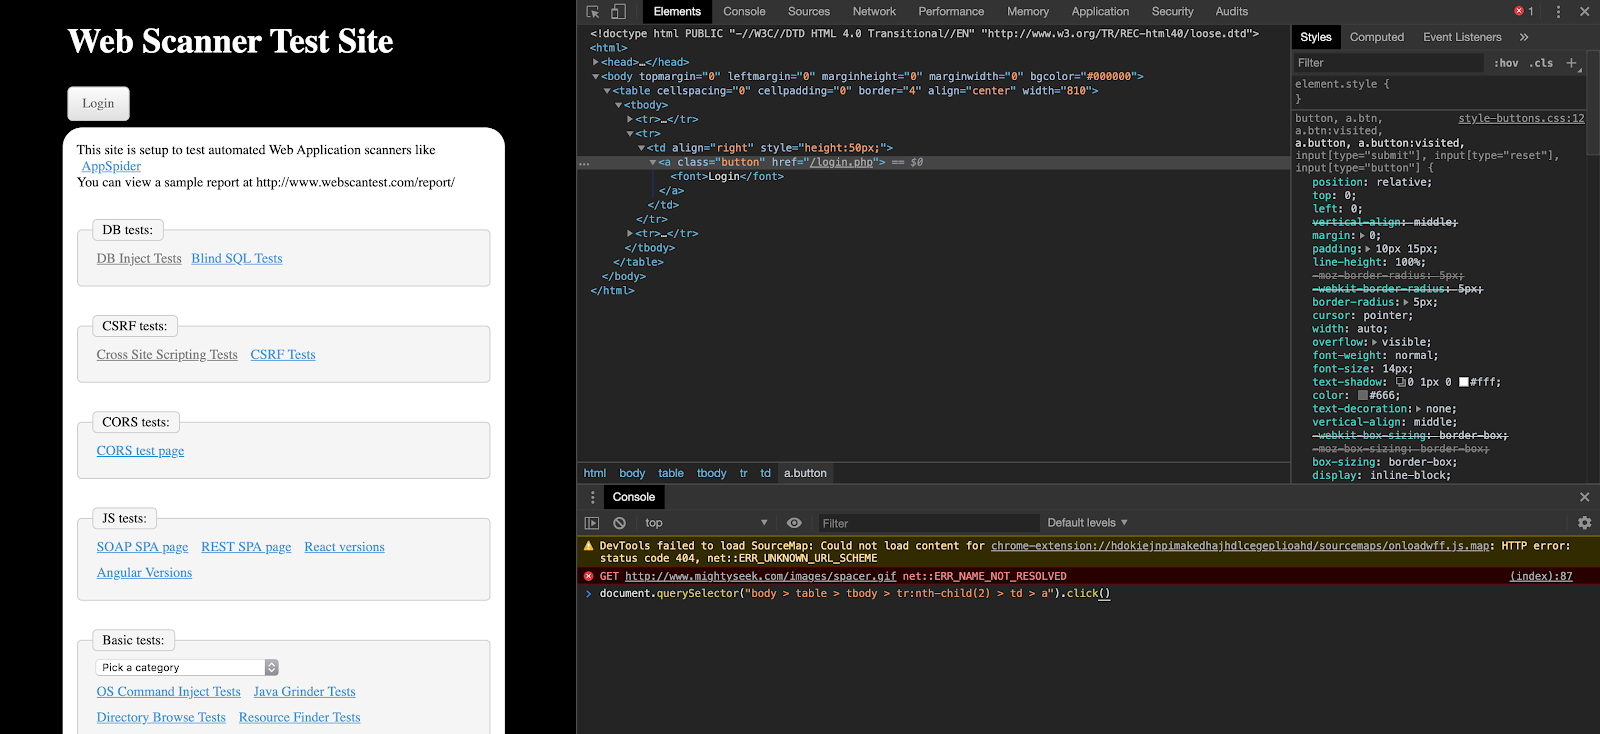
4. Once you hit enter, you will notice your browser loads the next page.
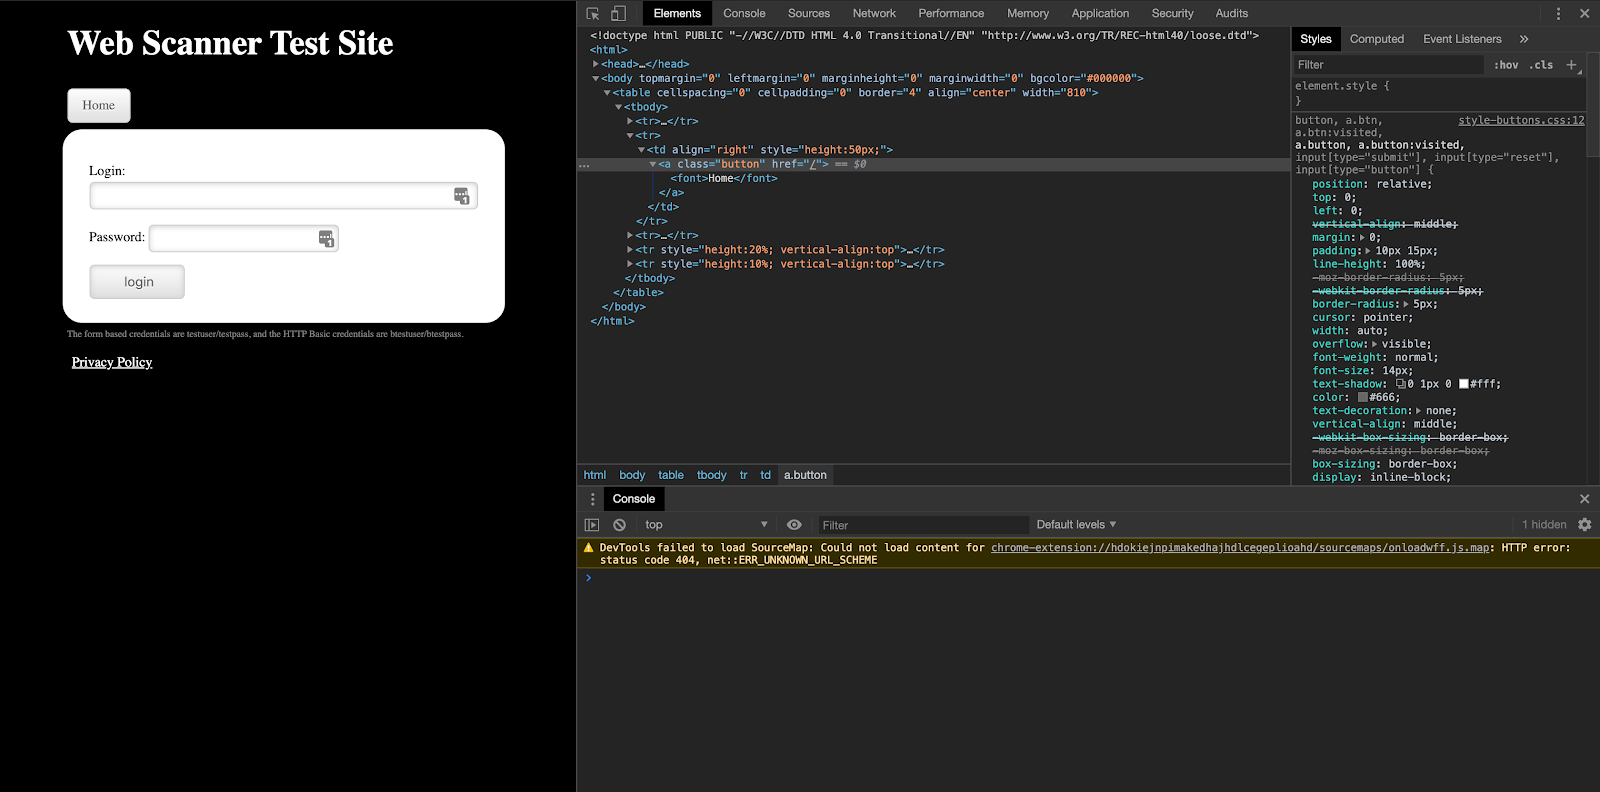
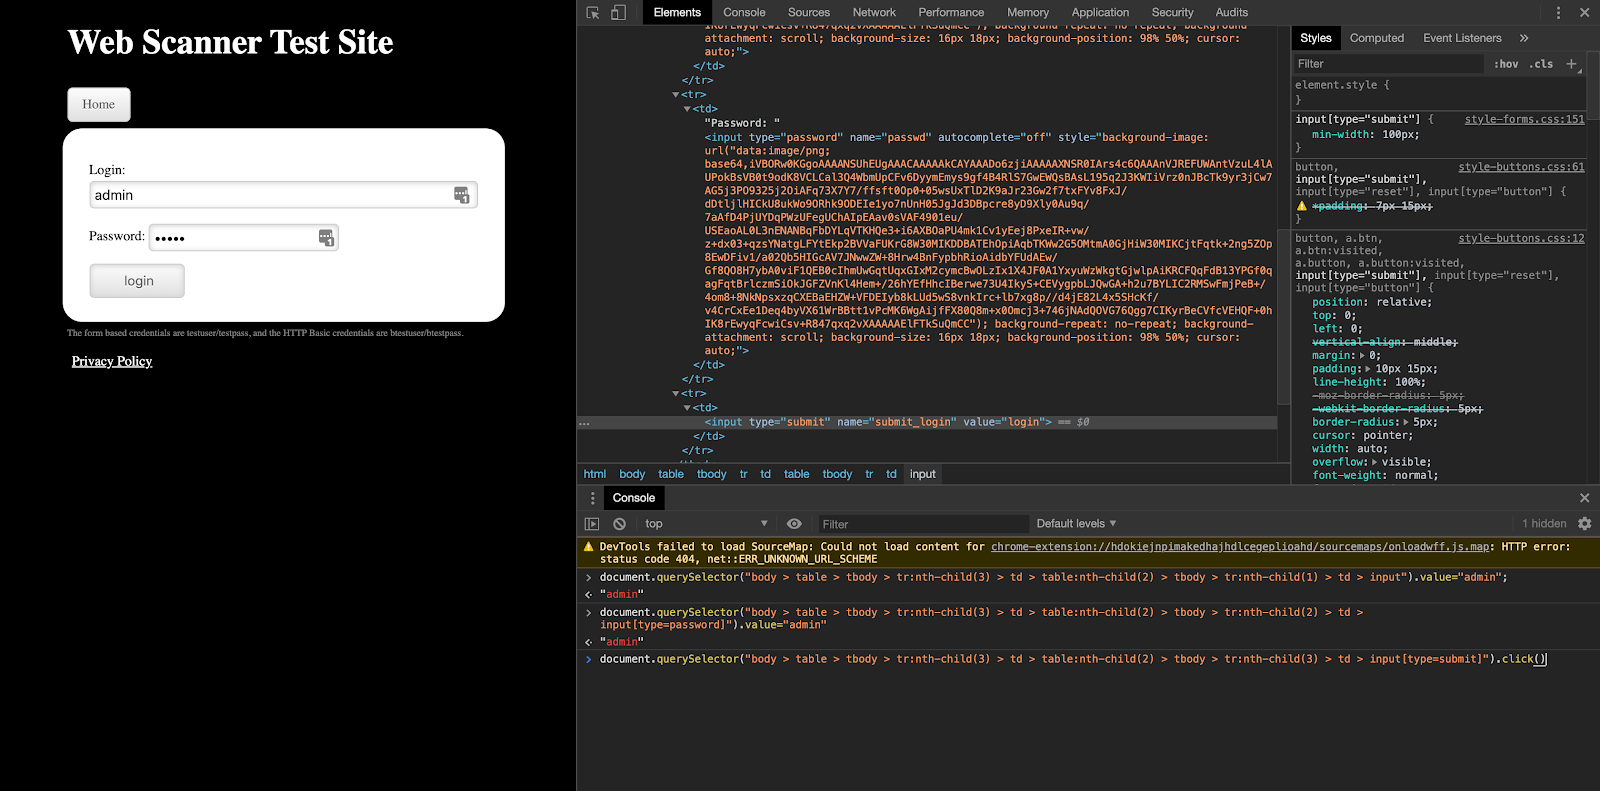
5. Now, this is where we repeat steps 2 and 3 above, but in this case, we are going to copy and execute js path to add values to the login and password fields, which is why we will add .value=”admin” at the end. Both our username and password is “admin” and we need to use the value being passed in “ ”.
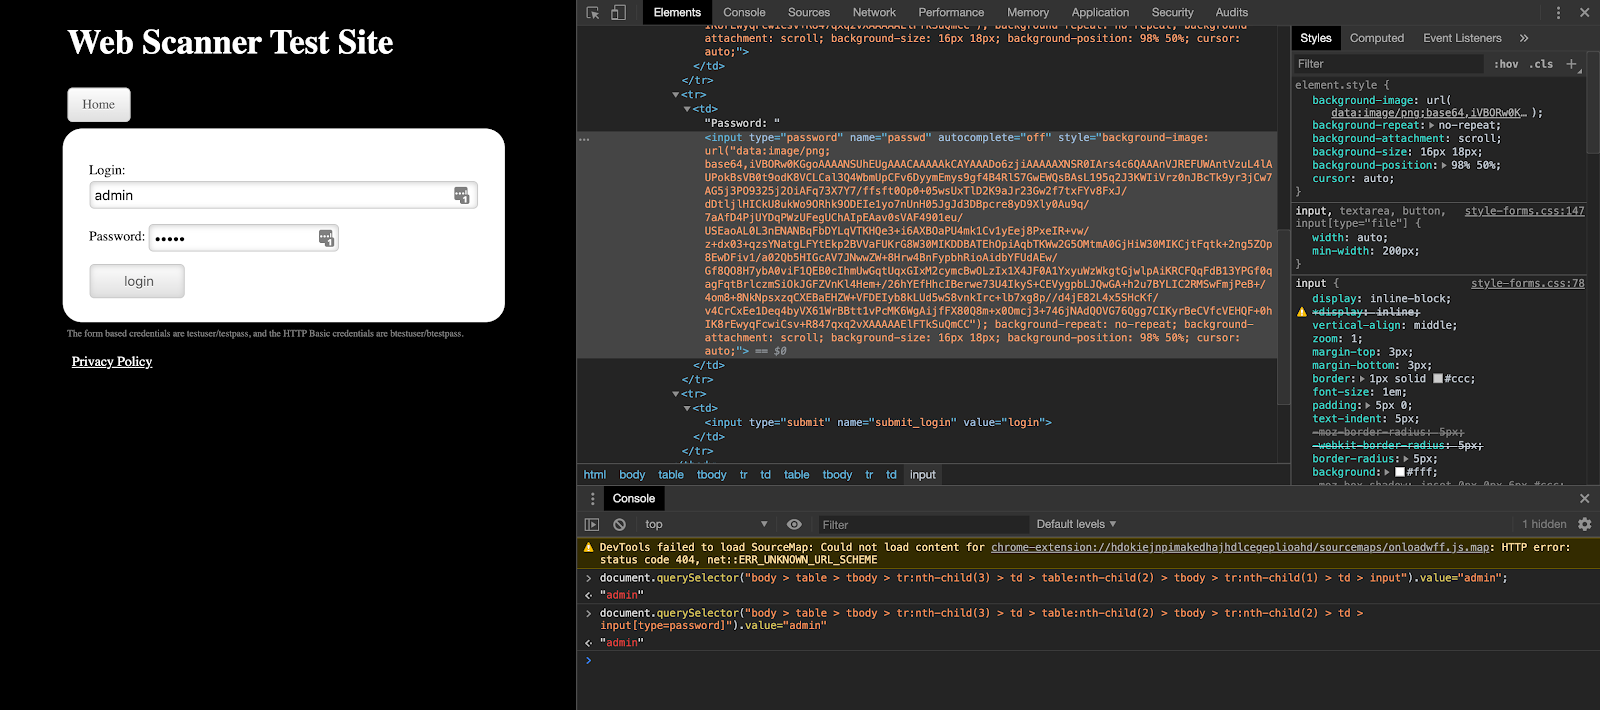
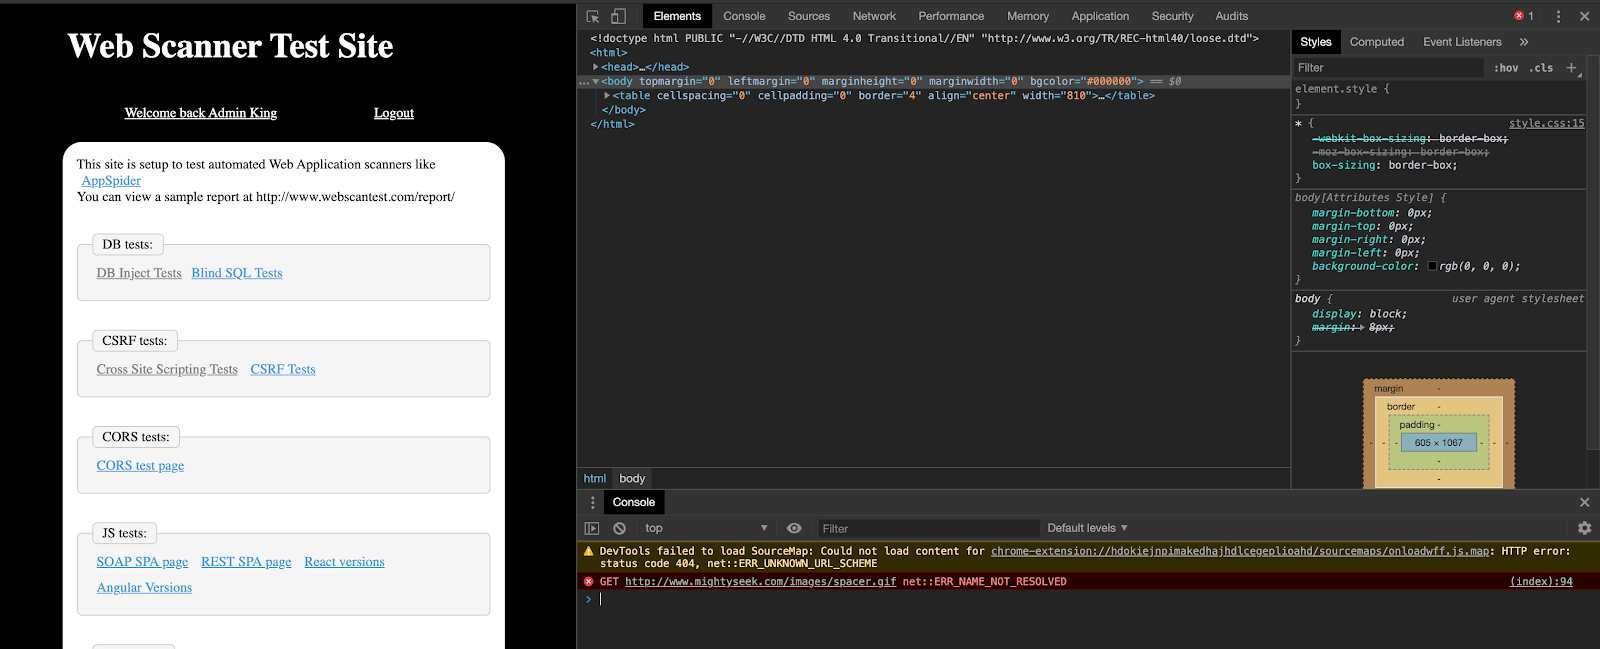
6. Once you have both fields completed, the last step would be to repeat steps 2 and 3 for our login button on this page. If the values being passed are correct, this should log us in. In the second screenshot, we can confirm we are definitely logged in as we see the Logout button.
So, we have four different Javascript paths that we copied and tested to make sure that each action we took can correctly be executed by the script.
- Log in to go to the page where we add username and password:
document.querySelector("body > table > tbody > tr:nth-child(2) > td > a").click() - Add username and password in corresponding fields:
document.querySelector("body > table > tbody > tr:nth-child(3) > td > table:nth-child(2) > tbody > tr:nth-child(1) > td > input").value=”admin”And document.querySelector("body > table > tbody > tr:nth-child(3) > td >table:nth-child(2) > tbody > tr:nth-child(2) > td > input[type=password]").value-”admin” - Clicking on the login button after values are passed:
document.querySelector("body > table > tbody > tr:nth-child(3) > td > table:nth-child(2) > tbody > tr:nth-child(3) > td > input[type=submit]").click()
Each of these JavaScript paths can be added to a macro event, bolded below (for our “Could not execute step 3” error as we discussed previously):
<MacroEvent>
<DbId>16A323EC34B6490CB9E1DBCFE43BD44E</DbId>
<ParentDbId>00000000000000000000000000000000</ParentDbId>
<WindowIndex>0</WindowIndex>
<EventType>JavaScript</EventType>
<UseEncryptedData>0</UseEncryptedData>
<Data><![CDATA[document.querySelector("body > table > tbody > tr:nth-child(2) > td > a").click()]]></Data>
<EncryptedData></EncryptedData>
<ElementPath><![CDATA[]]></ElementPath>
<Duration>10000</Duration>
<Enable>1</Enable>
<Optional>0</Optional>
</MacroEvent>
Or, if we want all steps to be executed in one macro event for where we add our username, password, and click on login, we can do something like:
<MacroEvent>
<DbId>16A323EC34B6490CB9E1DBCFE43BD44E</DbId>
<ParentDbId>00000000000000000000000000000000</ParentDbId>
<WindowIndex>0</WindowIndex>
<EventType>JavaScript</EventType>
<UseEncryptedData>0</UseEncryptedData>
<Data><![CDATA[document.querySelector("body > table > tbody > tr:nth-child(3) > td > table:nth-child(2) > tbody > tr:nth-child(1) > td > input").value=”admin”; document.querySelector("body > table > tbody > tr:nth-child(3) > td > table:nth-child(2) > tbody > tr:nth-child(2) > td > input[type=password]").value-”admin”;
document.querySelector("body > table > tbody > tr:nth-child(3) > td > table:nth-child(2) > tbody > tr:nth-child(3) > td > input[type=submit]").click();]]></Data>
<EncryptedData></EncryptedData>
<ElementPath><![CDATA[]]></ElementPath>
<Duration>10000</Duration>
<Enable>1</Enable>
<Optional>0</Optional>
</MacroEvent>
By doing the above, we can actually cut down from nine or 10 macro events for each step, plus delays between each, down to four macro events we “wrote” in JavaScript.
All in all our Javascript based macro will now look something like:
<?xml version="1.0"?>
<MacroEventList>
<MacroEvent>
<DbId>AAB009F4E11A440DAA01A5CB1094DFF1</DbId>
<ParentDbId>00000000000000000000000000000000</ParentDbId>
<WindowIndex>0</WindowIndex>
<EventType>Navigate</EventType>
<UseEncryptedData>0</UseEncryptedData>
<Data><![CDATA[http://www.webscantest.com/]]></Data>
<EncryptedData></EncryptedData>
<ElementPath><![CDATA[]]></ElementPath>
<Duration>6203</Duration>
<Enable>1</Enable>
<Optional>0</Optional>
</MacroEvent>
<MacroEvent>
<DbId>0F493FF817304551B14AD45F74B6FC7D</DbId>
<ParentDbId>00000000000000000000000000000000</ParentDbId>
<WindowIndex>0</WindowIndex>
<EventType>Delay</EventType>
<UseEncryptedData>0</UseEncryptedData>
<Data><![CDATA[]]></Data>
<EncryptedData></EncryptedData>
<ElementPath><![CDATA[]]></ElementPath>
<Duration>6249</Duration>
<Enable>1</Enable>
<Optional>0</Optional>
</MacroEvent>
<MacroEvent>
<DbId>16A323EC34B6490CB9E1DBCFE43BD44E</DbId>
<ParentDbId>00000000000000000000000000000000</ParentDbId>
<WindowIndex>0</WindowIndex>
<EventType>JavaScript</EventType>
<UseEncryptedData>0</UseEncryptedData>
<Data><![CDATA[document.querySelector("body > table > tbody > tr:nth-child(2) > td > a").click()]]></Data>
<EncryptedData></EncryptedData>
<ElementPath><![CDATA[]]></ElementPath>
<Duration>10000</Duration>
<Enable>1</Enable>
<Optional>0</Optional>
</MacroEvent>
<MacroEvent>
<DbId>112EF08C5540409AB8483C0199D1DE4F</DbId>
<ParentDbId>00000000000000000000000000000000</ParentDbId>
<WindowIndex>0</WindowIndex>
<EventType>Delay</EventType>
<UseEncryptedData>0</UseEncryptedData>
<Data><![CDATA[]]></Data>
<EncryptedData></EncryptedData>
<ElementPath><![CDATA[]]></ElementPath>
<Duration>5075</Duration>
<Enable>1</Enable>
<Optional>0</Optional>
</MacroEvent>
<MacroEvent>
<DbId>16A323EC34B6490CB9E1DBCFE43BD44E</DbId>
<ParentDbId>00000000000000000000000000000000</ParentDbId>
<WindowIndex>0</WindowIndex>
<EventType>JavaScript</EventType>
<UseEncryptedData>0</UseEncryptedData>
<Data><![CDATA[document.querySelector("body > table > tbody > tr:nth-child(3) > td > table:nth-child(2) > tbody > tr:nth-child(1) > td > input").value=”admin”; document.querySelector("body > table > tbody > tr:nth-child(3) > td > table:nth-child(2) > tbody > tr:nth-child(2) > td > input[type=password]").value-”admin”;
document.querySelector("body > table > tbody > tr:nth-child(3) > td > table:nth-child(2) > tbody > tr:nth-child(3) > td > input[type=submit]").click();]]></Data>
<EncryptedData></EncryptedData>
<ElementPath><![CDATA[]]></ElementPath>
<Duration>10000</Duration>
<Enable>1</Enable>
<Optional>0</Optional>
</MacroEvent>
<MacroEvent>
<DbId>28D2E36291D44116BA6FF375B5BA0AC5</DbId>
<ParentDbId>00000000000000000000000000000000</ParentDbId>
<WindowIndex>0</WindowIndex>
<EventType>Delay</EventType>
<UseEncryptedData>0</UseEncryptedData>
<Data><![CDATA[]]></Data>
<EncryptedData></EncryptedData>
<ElementPath><![CDATA[]]></ElementPath>
<Duration>6733</Duration>
<Enable>1</Enable>
<Optional>0</Optional>
</MacroEvent>
</MacroEventList>
Notice that when we added a JavaScript path, we modified a couple things in our macro:
We changed the <EventType> to be JavaScript.
We added our JavaScript paths in the <Data><![CDATA[]]></Data> section of the macro within ![CDATA[]]. We did that because the JavaScript event is passing a value or function.
We also removed any XPATH that may have existed in <ElementPath><![CDATA[xpath=//INPUT[@name="login"]]]></ElementPath>, because the JavaScript part in <DATA> takes care of finding the path too.
We ended each JavaScript path with a “;” to end that statement.
We made sure our <Duration> for the macro events is sufficient to execute at 10000 milliseconds.
With the steps mentioned, custom JavaScript can be used to replace specific macro events to help with advanced troubleshooting of the “Error executing macro …” error. These modified macros can be used in the Authentication section of a scan configuration within InsightAppSec or AppSpider, as discussed in the previous posts.
Will adding JavaScript to a macro always work?
The answer to this question really depends on how the JavaScript was written. The above example is a good starting point, but by no means the end all be all answer for all things JavaScript-related. The reason being when copying the JS path with the help of the browser, we are relying on the code to stay the same in order for our:
document.querySelector("body > table > tbody > tr:nth-child(3) > td > table:nth-child(2) > tbody > tr:nth-child(1) > td > input").value=”admin”
to always find the element that we are looking for. This could potentially change with each iteration your application is updated with, and this JavaScript might not work a second time. It's hard to know the answer unless you ask your developers and are aware of the build process, sprint cycle of your application, or are aware of what parts of the application are constantly changing versus what parts aren't.
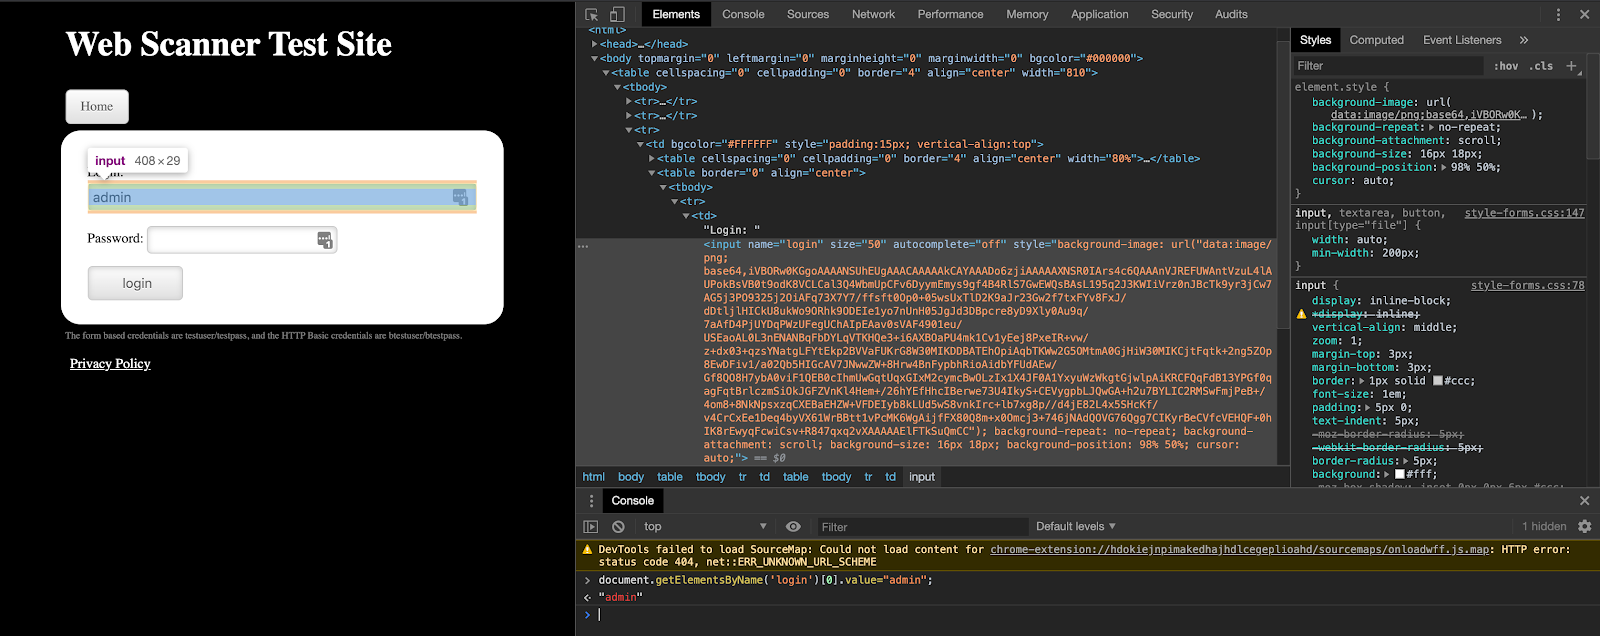
The aforementioned JavaScript step can be replaced by a much simpler written JS, which looks like this:
document.getElementsByName('login')[0].value="admin".
The way to understand what is happening is to break out the JavaScript:
- The document.getElementsByName('login') portion is attempting to look for elements by name, in this case “login”.
- [0] after that is to indicate to get the first item in the login element

3. The .value=”admin” at the end is to pass the string “admin” as a value to login (the variable we found in step one above.)
4. That can also be a .click(), which is a function that is mimicking a click action.
In short, our Login = “admin”, Password = ”admin” and Click on the Login button all can be replaced by the following JavaScript events:
document.getElementsByName('login')[0].value="admin";document.getElementsByName('passwd')[0].value="admin";document.getElementsByName('submit_login')[0].click();
You can review and test the above in the same manner, i.e., by inspecting the specific element on the page, going to the console portion of the developer tools (as seen in the screenshot above), and testing it out from the login page of our sample application.
If you are attempting to create a similar JavaScript for your own application, always make sure to test out your script in developer tools of a browser based on the aforementioned steps.
The steps above are meant to provide examples and alternatives of what is possible when getting into advanced troubleshooting with macros for authentication.
Once the required JavaScript edits to your macro have been made, the macro should be saved and tested in a scan. Steps on where to upload your macro for testing in scan configuration are shown in the first post under “How do I use my macro”.
In the past three posts, we reviewed what macros are, where and how to use them, and how to troubleshoot depending on possible error messages as seen in the event logs. As troubleshooting is an iterative process, reviewing error messages pertaining to macro failures and following the various steps listed in the blog posts thus far, should help with getting a macro for authentication to work successfully in your scan.