Last updated at Wed, 03 Jan 2024 16:26:24 GMT
Overview
Hello, fellow nerds! Today, I am going to walk you through deploying the Rapid7 Insight Agent in your AWS environment(s).
I get asked a lot about different options for deploying agents, whether it involves on-premise Windows/Linux infrastructure or cloud environments such as AWS EC2 instances. Though I typically recommend the use of configuration management tools and processes, I have found a number of customers don’t have configuration management implemented, and if they do, it is not widely adopted to ensure coverage.
With that said, I thought to myself, what could be a viable means to deploy agents where configuration management is not available? So, I set out on a journey to use AWS tooling to automatically deploy our Rapid7 Insight Agents.
Start securing your AWS environment with a free 30-day trial of Rapid7’s cloud-based security solutions.
Get StartedEnter the SSM agent
The AWS Simple Systems Manager agent can be found pre-packaged in several popular AMIs already and has several use cases, but one use case that caught my eye was RunCommand. The Documents used with RunCommand have plugins available that let us run shell commands on Linux EC2 instances (aws:runShellScript) and PowerShell commands on Windows EC2 instances (aws:runPowerShellScript). We will use this in combination with AWS Lambda to automatically deploy the Rapid7 Insight agent triggered by state changes in EC2 instances.
What we need to get started
- Access to AWS and authorization to create content in the following tools:
- S3
- Lambda
- Systems Manager
- CloudWatch
- IAM Policy and Role
- Some working knowledge of AWS and the terminology to follow along
- Access to the Rapid7 Insight platform Agent Management page
- EC2-managed instances with a functioning SSM agent
What we will use in AWS
- S3
- Lambda
- Systems Manager
- Documents
- RunCommand
- CloudWatch
- Log Groups
- Event Triggers
- IAM
- Policy creation
- Role creation
- KMS Key creation (There won’t be a guide on this, although I recommend reading the documentation)
Let’s start with the Rapid7 Insight Platform
So, we got our shiny new Insight Platform Agent Management page, so the first thing we want to do is log in and download the Insight Agent Installer to our desktop, then generate/copy the installer token. For this guide, we will work with both the Windows agent and Linux agent, so let’s get our files!
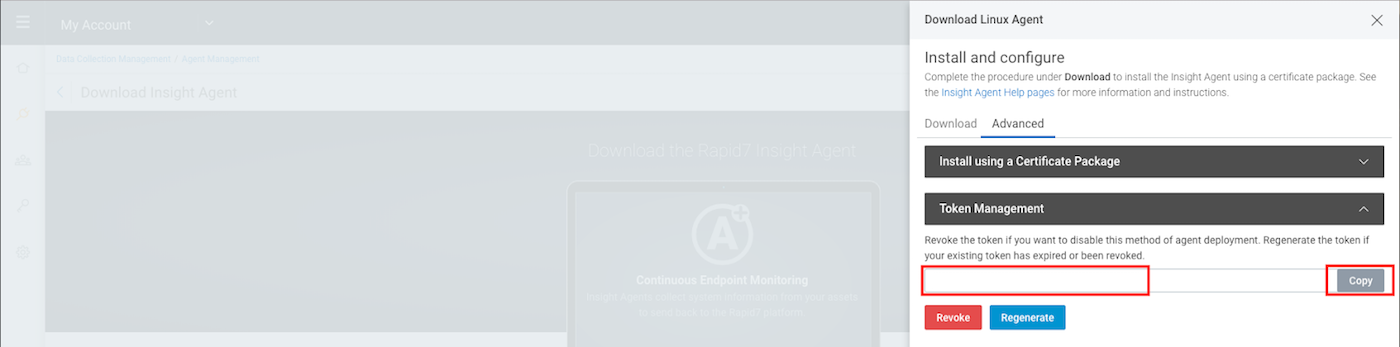
Navigate to My Account -> Data Collection Management -> Download Agent and click on Download Linux Agent.
Let’s Generate and Copy the token on the Advanced tab.
Going back to the Download tab, select Linux (64-bit)
Since we already have our token, we just need to download the windows agent installer, so go back and click on Download Windows Agent and select Windows (64-bit).
Note: The same token will be used by both Windows and Linux agent installers
Great! That was easy. We will come back to the platform later to validate agent installation.
Storing data in AWS S3
Log in to the AWS management console if you haven’t already and create an S3 bucket that will host the installer files we downloaded. The bucket should be private (thanks, automated reasoning!).
My directory path for each installer looks like the following:
To keep this guide simple, I am setting up my S3 bucket as a static website so I can download the installer files. I used this with a VPC endpoint to keep my traffic all within the AWS network, but there are several strategies for storing and retrieving files from S3 securely, such as using CloudFront to serve the S3 files over SSL and even using signed URLs and Cookies.
Creating the Systems Manager Document
Could we use the existing Documents? Probably, but I wanted a workflow that could handle the specific task of downloading and installing the agent for both Linux and Windows platforms. We are going to create three Documents.
Our first Document will download and install the agent for Windows EC2 instances. On the AWS Systems Manager page, create a new Document. Specify a name (mine will be R7-InstallInsightAgent-Windows) and select the Command option for the document type. In the JSON window, plug in the following details:
{
  "schemaVersion": "2.2",
  "description": "Install the Rapid7 Insight Agent on Windows.",
  "parameters": {
    "source": {
      "description": "(Required) Specify the information required.",
      "type": "String"
    },
    "token": {
      "type": "String",
      "description": "(Required) Specify a token for the Rapid7 Insight Agent."
    },
    "workingDirectory": {
      "type": "String",
      "default": "C:\\Users\\Administrator\\AppData\\Local\\Temp",
      "description": "(Optional) The path to the working directory.",
      "maxChars": 4096
    },
    "executionTimeout": {
      "type": "String",
      "default": "600",
      "description": "(Optional) The time in seconds for a command to complete before it is considered to have failed. Default is 600 (10 minutes). Maximum is 172800 (48 hours).",
      "allowedPattern": "([1-9][0-9]{0,4})|(1[0-6][0-9]{4})|(17[0-1][0-9]{3})|(172[0-7][0-9]{2})|(172800)"
    }
  },
  "mainSteps": [
    {
      "action": "aws:runPowerShellScript",
      "name": "InstallInsightAgent",
      "inputs": {
        "runCommand": [
          "$r7folder = \"{{ workingDirectory }}\\r7insight\"",
          "New-Item -ItemType directory -Path \"$r7folder\"",
          "$service = get-service -name ir_agent -ErrorAction SilentlyContinue",
          "if (-Not $service) {",
          "write-host \"Agent not installed, installing.\"",
          "$url = \"{{ source }}\"",
          "$output = \"$r7folder\\agent_installer.msi\"",
          "Invoke-WebRequest -Uri $url -OutFile $output",
          "$Arguments = @(\"/i\", \"$r7folder\\agent_installer.msi\", \"/l*v\", \"$r7folder\\debug.log\", \"CUSTOMTOKEN={{ token }}\", \"/quiet\", \"/qn\" )",
          "Start-Process msiexec -ArgumentList $Arguments -Wait -NoNewWindow",
          "Get-Content \"$r7folder\\debug.log\" | foreach {Write-Output $_}",
          "} else {",
          "write-host \"Agent already installed, exiting.\"",
          "}",
          "Remove-Item -Recurse -Force \"$r7folder\""
        ],
        "workingDirectory": "{{ workingDirectory }}",
        "timeoutSeconds": "{{ executionTimeout }}"
      }
    }
  ]
}
Now, since I don’t want to wait any longer, let’s run a quick test to make sure our document does what we expect it to do.
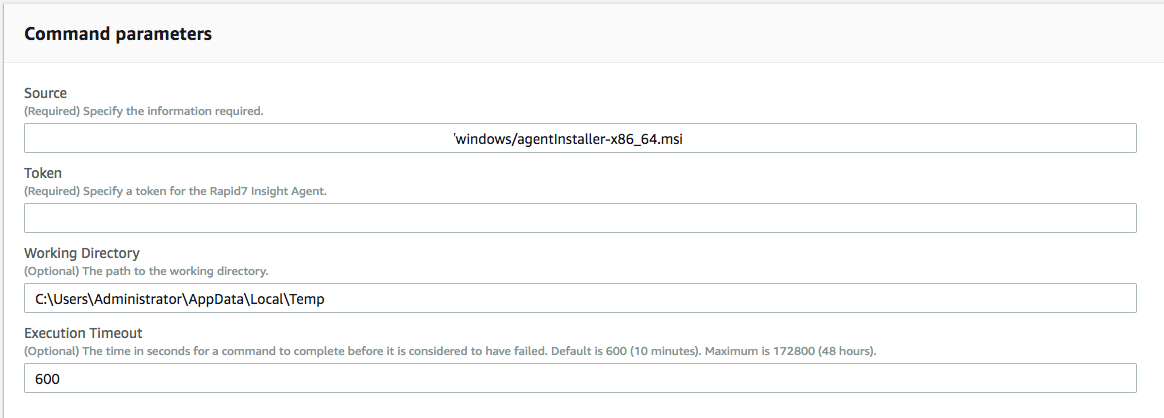
On Systems Manager, select Run Command from the menu and then the Run Command button to start the workflow. Search for and select the Document we created. Below is an example of how I filled out the parameters. We can also uncheck ALL output options for this run, so we don’t create any content in S3 or CloudWatch yet.
Before we run the document, make sure to select a Windows EC2 instance managed by AWS Systems Manager (SSM) to target for agent installation.
Alternatively, you can launch the Document we created using the awscli. Here is a sample. If running from the command line making sure to replace <DOCUMENT_NAME>, <INSTANCE_ID>, <SOURCE>, and <TOKEN> with the appropriate values:
aws ssm send-command --document-name "<DOCUMENT_NAME>" --document-version "\$DEFAULT" --isntance-ids “<INSTANCE_ID>” --parameters '{"workingDirectory":["C:\\Users\\Administrator\\AppData\\Local\\Temp"],"executionTimeout":["600"],"source":["<SOURCE>"],"token":["<TOKEN>"]}'
If launching in the UI, we can keep refreshing the page until our command completes and view any output. As long as we don’t see any errors, the agent should have installed correctly, so let’s log back in to our Rapid7 Insight account and see if any agents connected.

Great! Looks like the agent called home, and we can expect data to get populated shortly after for products in which we are licensed.
Let’s now go back and create the other two Systems Manager Documents now that we know this process works. Following the workflow for the first Document, we can create our Linux Document next using the following JSON data:
{
  "schemaVersion": "2.2",
  "description": "Install the Rapid7 Insight Agent on Linux.",
  "parameters": {
    "source": {
      "description": "(Required) Specify the information required to access the Linux resource.",
      "type": "String"
    },
    "token": {
      "type": "String",
      "description": "(Required) Specify a token for the Rapid7 Insight Agent."
    },
    "workingDirectory": {
      "type": "String",
      "default": "/tmp",
      "description": "(Optional) The path to the working directory.",
      "maxChars": 4096
    },
    "executionTimeout": {
      "type": "String",
      "default": "600",
      "description": "(Optional) The time in seconds for a command to complete before it is considered to have failed. Default is 600 (10 minutes). Maximum is 172800 (48 hours).",
      "allowedPattern": "([1-9][0-9]{0,4})|(1[0-6][0-9]{4})|(17[0-1][0-9]{3})|(172[0-7][0-9]{2})|(172800)"
    }
  },
  "mainSteps": [
    {
      "action": "aws:runShellScript",
      "name": "InstallInsightAgent",
      "inputs": {
        "runCommand": [
          "r7dir={{ workingDirectory }}/r7insight",
          "mkdir -p $r7dir",
          "if [ $(ps -ef |grep ir_agent |wc -l) -lt 2 ]; then",
          "echo \"ir_agent not installed, installing\"",
          "curl {{ source }} -o $r7dir/agent_installer.sh",
          "bash $r7dir/agent_installer.sh install_start --token {{ token }}",
          "else",
          "echo \"ir_agent already installed, exiting\"",
          "fi",
          "rm -rf $r7dir"
        ],
        "workingDirectory": "{{ workingDirectory }}",
        "timeoutSeconds": "{{ executionTimeout }}"
      }
    }
  ]
}
The third and final document will be used to run the Linux document, should the target EC2 instance be identified as a Linux platform type or run the Windows document where an EC2 instance platform type is Windows. It is this third document that our Lambda function will trigger, so we can rely on the predefined platform types of Windows and Linux in AWS SSM schemaVersion 2.2 to route appropriately.
{
  "schemaVersion": "2.2",
  "description": "Install the Rapid7 Insight Agent.",
  "parameters": {
    "linuxSource": {
      "description": "(Required) Specify the information required to access the Linux resource.",
      "type": "String"
    },
    "windowsSource": {
      "description": "(Required) Specify the information required to access the Windows resource.",
      "type": "String"
    },
    "token": {
      "type": "String",
      "description": "(Required) Specify a token for the Rapid7 Insight Agent"
    },
    "linuxWorkingDirectory": {
      "type": "String",
      "default": "/tmp",
      "description": "(Optional) The path to the working directory on your Linux instance.",
      "maxChars": 4096
    },
    "windowsWorkingDirectory": {
      "type": "String",
      "default": "C:\\Users\\Administrator\\AppData\\Local\\Temp",
      "description": "(Optional) The path to the working directory on your Windows instance.",
      "maxChars": 4096
    },
    "executionTimeout": {
      "type": "String",
      "default": "600",
      "description": "(Optional) The time in seconds for a command to complete before it is considered to have failed. Default is 600 (10 minutes). Maximum is 172800 (48 hours).",
      "allowedPattern": "([1-9][0-9]{0,4})|(1[0-6][0-9]{4})|(17[0-1][0-9]{3})|(172[0-7][0-9]{2})|(172800)"
    }
  },
  "mainSteps": [
    {
      "action": "aws:runDocument",
      "name": "R7InstallInsightAgentLinux",
      "precondition": {
        "StringEquals": [
          "platformType",
          "Linux"
        ]
      },
      "inputs": {
        "documentType": "SSMDocument",
        "documentPath": "R7-InstallInsightAgent-Linux",
        "documentParameters": "{\"token\": \"{{ token }}\", \"executionTimeout\": \"{{ executionTimeout }}\", \"source\": \"{{ linuxSource }}\", \"workingDirectory\": \"{{ linuxWorkingDirectory }}\" }"
      }
    },
    {
      "action": "aws:runDocument",
      "name": "R7InstallInsightAgentWindows",
      "precondition": {
        "StringEquals": [
          "platformType",
          "Windows"
        ]
      },
      "inputs": {
        "documentType": "SSMDocument",
        "documentPath": "R7-InstallInsightAgent-Windows",
        "documentParameters": "{\"token\": \"{{ token }}\", \"executionTimeout\": \"{{ executionTimeout }}\", \"source\": \"{{ windowsSource }}\", \"workingDirectory\": \"{{ windowsWorkingDirectory }}\" }"
      }
    }
  ]
}
We want to make sure the Documents are private if you prefer not to share with the world. To validate, search for the Documents you just created—Private should be selected on the Permissions tab. You can choose other accounts to share this Document with if desired. This can be helpful if you have several AWS accounts in your deployment.
The Parameter Store
To make it easy to manage the variables that will be used when launching Documents, we will place our variables in the Parameter Store within Systems Manager. We will organize the parameters similar to what’s described here.
Let’s store our parameters! Make sure they are all String types except for the Token, which will be a SecureString. I am going to create mine like the following and then pull them from my Lambda script we will create later on:
- /R7Insight/Installer/Token
- /R7Insight/Installer/DocumentName
- /R7Insight/Installer/CloudWatchLogGroup
- /R7Insight/Installer/Windows/Source
- /R7Insight/Installer/Linux/Source
- /R7Insight/Installer/Windows/WorkingDirectory
- /R7Insight/Installer/Linux/WorkingDirectory
Note: The encryption key selected for /R7Insight/Installer/Token will later need to be assigned to the Lambda function in order to decrypt our SecureString parameter and send to SSM. Also, use a trusted encryption key with the appropriate access controls in place for both administration and encryption/decryption.
Up until now, we should have our Linux and Windows installer files in S3, stored our parameters, and have three private documents that we can use to download and install the Rapid7 Insight Agent. We also tested the Windows document to validate that we can at least install an agent for an EC2 instance in our environment.
The next steps will include creating the appropriate IAM Policy and Role for our Lambda function, creating a log group in CloudWatch so we can monitor the log output when the Lambda function triggers, and finally creating our CloudWatch event that will trigger our Lambda function to fire.
Creating the IAM policy and role for Lambda
The next step is to create our IAM policy and role that we will use for our Lambda function.
Using the JSON policy below as a guide, create a policy that allows SendCommand for Systems Manager and GetParameters for the Parameter Store. Also, add an ALLOW for SendCommand to target any EC2 instances in scope. Make sure you are as restrictive as possible for the resources you wish your Lambda function to have access to by supplying the full ARN of each.
{
    "Version": "2012-10-17",
    "Statement": [
        {
            "Effect": "Allow",
            "Action": [
                "ssm:SendCommand",
                "ssm:GetParameters",
                "ssm:GetParameter"
            ],
            "Resource": [
                "<PARAMETER_ARN>",
                "<DOCUMENT_ARN>",
                "<EC2_ARN>"
            ]
        }
    ]
}
Now let’s create an IAM role and attach our recently created policy. When creating the role, select AWS Service -> Lambda then click Next. Select the policy we created above and click Next. Supply a name and description, then click Create Role.
CloudWatch Log Group
When our Lambda function runs, we want to throw logs somewhere. To do this, we can just create a Log Group in CloudWatch. Navigate to CloudWatch -> Logs -> Actions -> Create Log Group. Provide a friendly name, and that’s all there is to it. Easy!
The Lambda function
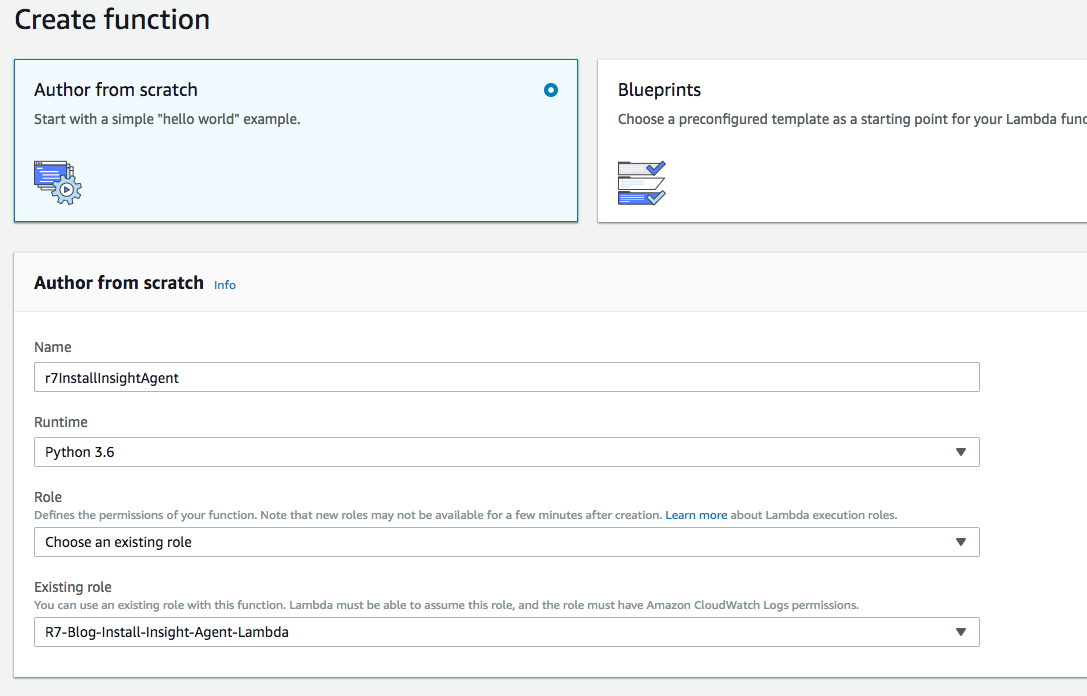
Now we can create this Lambda function I have been talking so much about. Navigate to AWS Lambda and make sure to select Python 3.6 for the runtime, since we will be using a Python script, and choose the IAM Role we created that will allow the Lambda function access to pull values from Parameter Store and issue a SendCommand to the SSM Agent.
After completing this part of the wizard, let’s configure a sample test event. Let’s use the following JSON as our sample test event. I replaced the instance-id value with an actual instance-id in my environment so when I test the Lambda function, I could see it run all the way through.
{
 "version": "0",
 "id": "ee376907-2647-4179-9203-343cfb3017a4",
 "detail-type": "EC2 Instance State-change Notification",
 "source": "aws.ec2",
 "account": "123456789012",
 "time": "2015-11-11T21:30:34Z",
 "region": "us-east-1",
 "resources": [
   "arn:aws:ec2:us-east-1:123456789012:instance/i-abcd1111"
 ],
 "detail": {
   "instance-id": "i-abcd1111",
   "state": "running"
 }
}
Once we configured our test event, we can scroll down and copy the following code in the Function Code section.
import boto3
import json
from botocore.exceptions import ClientError

DOCUMENT_PARAMETER = '/R7Insight/Installer/DocumentName'
CLOUDWATCH_LOG_GROUP_PARAMETER = '/R7Insight/Installer/CloudWatchLogGroup'

DOCUMENT_PARAMETERS = {
   '/R7Insight/Installer/Token': 'token',
   '/R7Insight/Installer/Windows/Source': 'windowsSource',
   '/R7Insight/Installer/Linux/Source': 'linuxSource',
   '/R7Insight/Installer/Windows/WorkingDirectory': 'windowsWorkingDirectory',
   '/R7Insight/Installer/Linux/WorkingDirectory': 'linuxWorkingDirectory'
}


def lambda_handler(event, context):
   print("Received event: " + json.dumps(event, indent=2))
   instance = event['detail']['instance-id']

   print("Installing Insight Agent on Instance: {}".format(instance))

   ssm_client = boto3.client('ssm')

   result = install_insight_agent(instance, ssm_client)

   return result


def get_parameters(client, params):
   try:
       response = client.get_parameters(
           Names=params,
           WithDecryption=True
       )
   except ClientError as e:
       raise e
   else:
       print("Retrieved parameters")
       parameters = response['Parameters']
   return parameters


def get_parameter(client, param):
   try:
       response = client.get_parameter(
           Name=param,
           WithDecryption=False
       )
   except ClientError as e:
       raise e
   else:
       print("Retrieved parameter")
       parameter = response['Parameter']
   return parameter


def install_insight_agent(instance, client):
   print("Get parameters for the SSM document")
   result = get_parameters(client, list(DOCUMENT_PARAMETERS.keys()))
   parameters = {}
   for parameter in result:
       parameters[DOCUMENT_PARAMETERS[parameter['Name']]] = [parameter['Value']]

   print("Get parameter for Document name")
   result = get_parameter(client, DOCUMENT_PARAMETER)
   document = result['Value']

   print("Get parameter for CloudWatch Log Group name")
   result = get_parameter(client, CLOUDWATCH_LOG_GROUP_PARAMETER)
   cloudwatch_log_group = result['Value']

   print('Run SendCommand to document: {} for instance: {}'.format(document, instance))
   try:
       client.send_command(InstanceIds=[instance],
                           DocumentName=document,
                           Parameters=parameters,
                           MaxConcurrency='1',
                           CloudWatchOutputConfig={
                               'CloudWatchLogGroupName': cloudwatch_log_group,
                               'CloudWatchOutputEnabled': True
                           },
                           TimeoutSeconds=900
                           )
   except ClientError as e:
       raise e
   else:
       print('Issued {} for instance: {}'.format(document, instance))
   return True
The script is does a number of things, but is pretty straightforward:
- Event for an EC2 instance entering the running state sent to our main function lambda_handler
- Grab parameters we stored in the Parameter Store
- Launch the Document and target the EC2 instance the event was created for
- The Document will take care of the rest and install the Insight Agent
- Log output sent to the CloudWatch log group we defined earlier
CloudWatch event trigger
With our Lambda function built, we can create the CloudWatch event rule that will trigger the function to run. We can do this from the Lambda function page we were just on by adding CloudWatch Events from the Add Triggers menu.

If we scroll down, we will create a New Rule and fill the form out similar to the following:
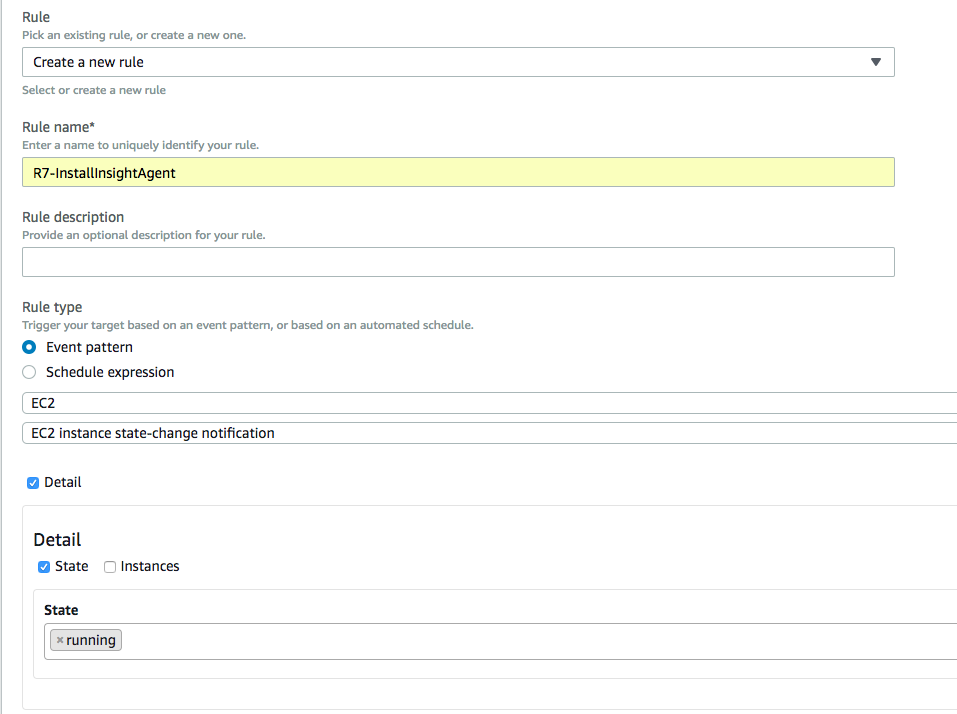
We want to trigger the Lambda function when EC2 instances enter the running state. We can click Add at the bottom to add the rule.
The payoff
Congratulations! We did a lot, but we can now test what we just created simply by launching an EC2 instance that is set up to be managed through the AWS SSM agent. We should notice our Lambda function trigger when the instance enters the running state, see successful log messages in our CloudWatch log group, and see the Rapid7 Insight Agent communicate with the Insight platform.
I created a short video to demonstrate what this looks like:
Next steps
So, we set up our Lambda function to launch when EC2 instances enter the running state, but if progressing this further, we may want to run our Lambda function on a schedule to ensure the agent is installed and running on instances with the SSM agent. We can also be more restrictive by tagging EC2 instances and changing our Lambda function to only trigger the SSM Document when instances are tagged appropriately.
The Command document’s code for both Windows and Linux can also be adjusted if there is some additional error handling, comments, or steps to perform outside of the minimal workflow provided in this blog.
Maybe you are an expert with Python, PowerShell, Shell Scripting, or more general-purpose configuration management tools, such as Puppet, Chef, Ansible, Salt, etc., and want to improve what I provided! If so, I encourage you to do so. This post is focused on a deployment in AWS, but the same methodology can be leveraged with a variety of tools.
For all things Insight Agent, please see our help documentation!