Last updated at Wed, 14 Nov 2018 21:07:21 GMT
Hello, InsightIDR blue teamers! Last week, we released Universal Event Formats (UEF), which greatly expands our user behavior analytics (UBA) support for DHCP, antivirus, ingress authentications, and VPN. For UEF to work, all you need to do is transform your previously unsupported log into a UEF and send it for automatic user attribution in InsightIDR.

Today’s post is a step-by-step walkthrough of using NXLog to transform an ingress authentication log into UEF. NXLog is available in both a free community edition, NXLog CE, and a commercial enterprise edition. In this case, we’ll use NXLog CE.
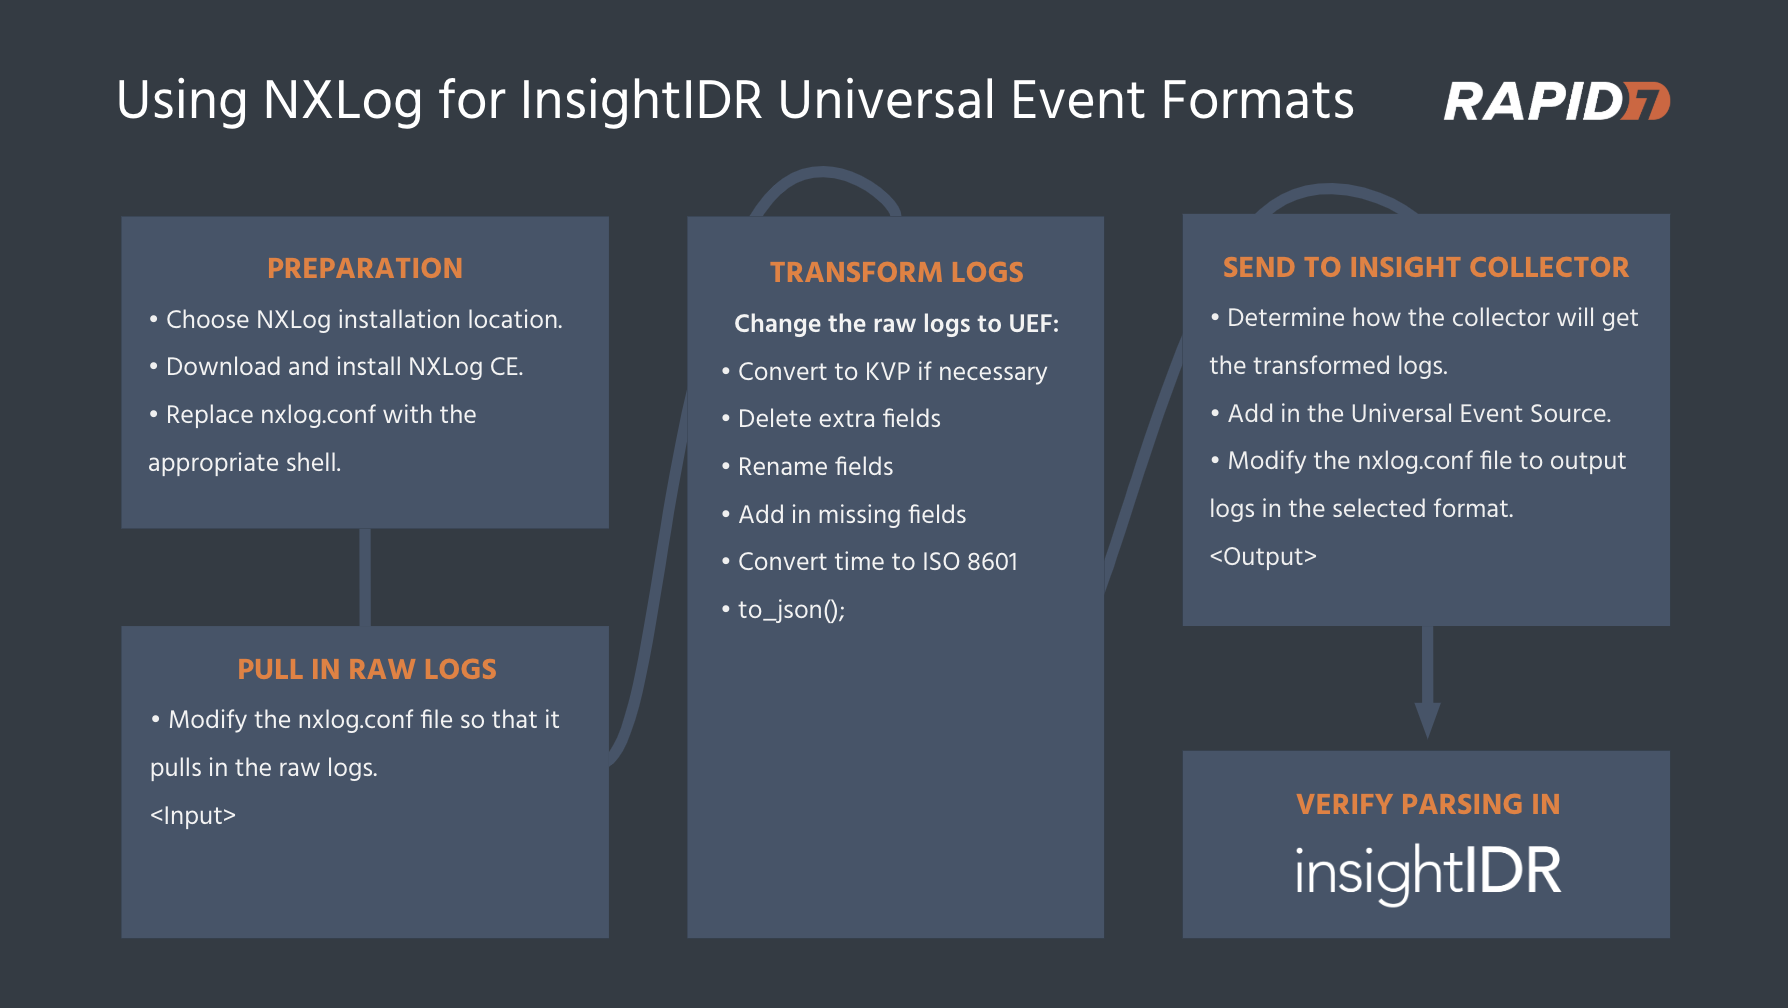
The basic steps shown in the graphic below highlight how to download and install NXLog, modify the default nxlog.conf file to ingest the raw logs and output in Rapid7 UEF, then simply send and verify successful ingestion into InsightIDR.
I recorded the following video walkthrough that you can watch paired with this blog guide.
1. Collect the logs
The first step is deciding where to install NXLog CE. Two recommended options are:
- Install it on the system where the logs are generated (verify OS compatibility).
- Install NXLog CE onto your InsightIDR collector.
In the video, my source system is running Windows and the log is in a text format, so it makes sense to install NXLog CE on it. If I were instead using syslog to forward the logs from a device to NXLog CE, it makes more sense to install NXLog CE on the collector.
Next, download the appropriate version for your system—in my case, the Windows version. You can install NXLog with the default options.
At this point, you should keep the “NXLog User Guide” and “NXLog Community Edition Reference Manual” handy, which are both available from the NXLog documentation site.
First, we should prep the system that has NXLog CE so that we can change configurations, test, and repeat until everything is working as needed.
I installed NXLog CE to the default location on the same system that has the logs I need to collect, C:\Program Files (x86)\nxlog. This folder contains a subfolder called conf that has the NXLog configuration file, nxlog.conf. Although the NXLog install created a default nxlog.conf, I now need to edit it to manipulate my logs. I start by making a copy of the nxlog.conf as a backup.
Next, I open services.msc so that I can stop and start the NXLog service as needed for my testing. You’ll need to restart the service for each new test, so it’s best to have it handy and open. First, stop the NXLog service—we don’t want it to run just yet.
When NXLog starts, it will create a diagnostic log for itself called nxlog.log. I chose to write the nxlog.log file to C:\Program Files (x86)\nxlog\data, its typical location (this is a setting in nxlog.conf).
We want to tail this file so that it tracks any new entries. This is where NXLog will post any error messages, parsing issues, etc., so keep nxlog.log open. Windows doesn’t have a native tool to tail files, so you can use the free BareTail tool to do this.
nxlog.conf can be edited with any text editor, so use your favorite—Notepad will suffice, for example. Onto the next step!
1b. Edit nxlog.conf
NXLog uses nxlog.conf to understand how to read in logs, manipulate them, and forward them to a receiving device. We need to edit nxlog.conf to input and convert logs into UEF, and forward them to the InsightIDR collector.
nxlog.conf has three main sections: global directives, input and output blocks, and a route block. Global directives define what NXLog can do. The input block reads the source logs, while the output block defines how the logs are forwarded and the route block tells NXLog what order to process the input and output blocks in. We’ll need to modify each of these sections to successfully send our logs to InsightIDR.
Based on the information above, a shell for nxlog.conf file looks like this:
## This is a sample configuration file. See the nxlog reference manual about the
## configuration options. It should be installed locally and is also available
## online at http://nxlog.org/docs/

## Please set the ROOT to the folder your nxlog was installed into,
## otherwise it will not start.

#define ROOT C:\Program Files\nxlog
define ROOT C:\Program Files (x86)\nxlog

Moduledir %ROOT%\modules
CacheDir %ROOT%\data
Pidfile %ROOT%\data\nxlog.pid
SpoolDir %ROOT%\data
LogFile %ROOT%\data\nxlog.log

<Extension _json>
    Module  xm_json
</Extension>

#Add in required extensions here

<Input in>
#Add in input method here
 </Input>

 <Output out>
#Add in output method here
</Output>

 <Route 1>
	 Path		 in => out
</Route>
The first bit details where NXLog is installed, cache folder, etc. Next are <Extension> blocks, which define global directives. You’ll need a directive for each type of module, but we don’t need to worry about them yet. Finally, you’ll see the <Input>, <Output>, and <Route> blocks.
We’ll start with this shell and add to each section.
1c. Read in the logs
Let’s start by filling in the <Input> section in nxlog.conf. Here, our logs are in a folder on the same system as the NXLog CE installation. The application is writing log files to C:\SomeSoftware\logs, and output as LogFile1.txt, LogFile2.txt, etc. Each log entry is written into the file with one log entry per line.
From the “NXLog User Guide,” we can use this for input:
<Input in>
#Example reading in a text log file
 Module  im_file
 File 'c:\SomeSoftware\logs\logfile*.txt'
 InputType LineBased
 SavePos TRUE
 PollInterval 1
 </Input>
Additional input methods are described in detail in the NXLog guides.
1d. Output the transformed logs
Next, I need to select a method for <Output>. InsightIDR has three options for Universal Event Formats:
- Watch a directory
- Read in a text file
- Collect using syslog
We’ll use syslog in this example, but will also write out the output into a text file for easier testing.
Therefore, we’ll use two <Output> sections:
- Text files for our test output
- Syslog to send to InsightIDR
After reviewing the “NXLog User Guide,” I select the om_file and om_udp output methods:
<Output resultfile_out>
#This section creates a text-based output file
    Module      om_file
	file		'c:\SomeSoftware\logs\results.csv'
</Output>

<Output out>
    Module      om_udp
    #This is the IP address of the InsightIDR collector
    Host        192.168.0.46
    #This is the port I am going to use for the Universal Event Source
    Port        10010
</Output>
See the NXLog documentation for detail on further output options.
1e. Routes and other NXLog configurations
We’re at the final section, the Route block. Our flow for the logs is simple: We want them to be read in using <Input>, and then go to both of the <Output> blocks. Here is the Route block:
 <Route 1>
	 Path		 in => out, resultfile_out
</Route>
Before we test, we need to add directives by defining all the NXLog extensions being used in nxlog.conf. So far, our nxlog.conf defines one extension for syslog, which allows up to output logs as syslog. We will need two extensions in the nxlog.json file: one for syslog, and one for JSON. As our final logs should be in JSON, we should add in a <Extension> for outputting using syslog, xm_json. I am not yet using the xm_json extension, but I know I must as my final logs are required to be in JSON format.
That brings us to the updated nxlog.conf:
## This is a sample configuration file. See the nxlog reference manual about the
## configuration options. It should be installed locally and is also available
## online at http://nxlog.org/docs/

## Please set the ROOT to the folder your nxlog was installed into,
## otherwise it will not start.

#define ROOT C:\Program Files\nxlog
define ROOT C:\Program Files (x86)\nxlog

Moduledir %ROOT%\modules
CacheDir %ROOT%\data
Pidfile %ROOT%\data\nxlog.pid
SpoolDir %ROOT%\data
LogFile %ROOT%\data\nxlog.log

<Extension _json>
    Module  xm_json
</Extension>

<Extension syslog>
    Module  xm_syslog
</Extension>

<Input in>
#Example reading in a text log file
 Module  im_file
 File 'c:\SomeSoftware\logs\logfile*.txt'
 InputType LineBased
 SavePos TRUE
 PollInterval 1
 </Input>

<Output resultfile_out>
#This section creates a text-based output file
    Module      om_file
	file		'c:\SomeSoftware\logs\results.csv'
</Output>

<Output out>
    Module      om_udp
	#This is the IP address of the InsightIDR Collector
    Host        192.168.0.46
	#This is the port configured on the Universal Event Source
    Port        10010
</Output>


 <Route 1>
	 Path		 in => out, resultfile_out
</Route>
Before we continue, it makes sense to test the configuration. Let’s now start the NXLog service. Watch for errors in C:\Program Files (x86)\nxlog\data\nxlog.log by opening the file with baretail.exe installed earlier.
As new log entries are written into the log files in the C:\SomeSoftware\logs folder, I expect NXLog should collect and write them into a results.csv file. We haven’t done any log conversion, so they should appear in their original form. If you encounter errors in nxlog.log, or don’t get results, fix these issues before continuing.
2. Convert the logs to UEF
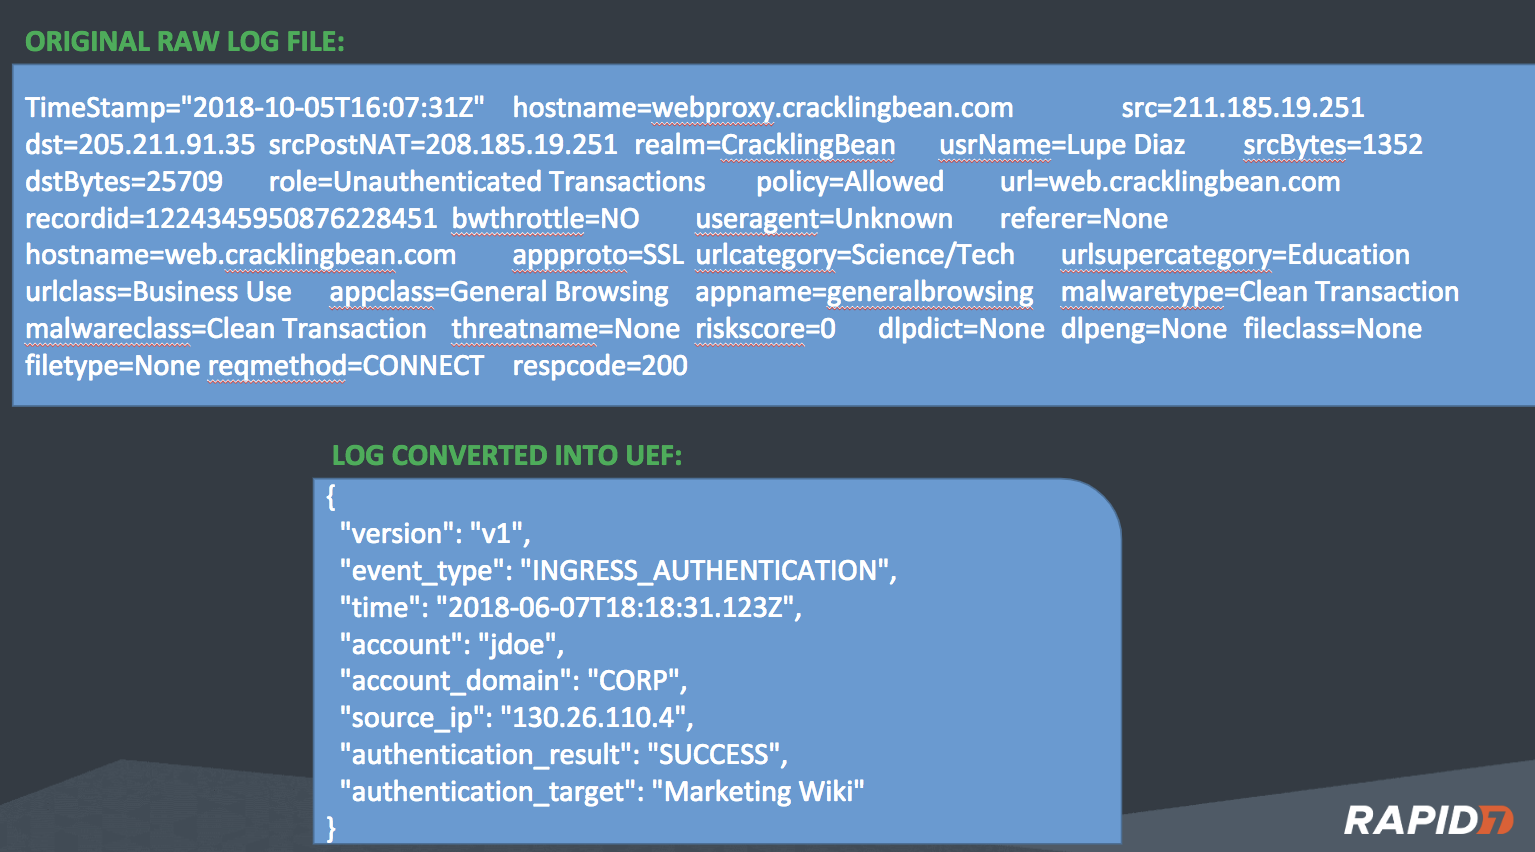
Going back to our objective, converting the Raw Log into UEF, there’s a bit of work ahead of us!
First, we should consider how to read in and parse the logs. In our example, the log is in Key Value Pair (KVP) format. Each field of the log entry contains <key1>=<value1>. After consulting the “NXLog CE Reference Manual,” we choose the xm_kvp module to read in the fields. This module requires some specifications for the data format to be defined in the kvp extension, such as what separates the key value pairs, so I take note of this information in my actual logs.
We need to add in an extension for kvp and modify my <Input> section to run the kvp module. After some testing to determine which options work with my input, I discover that my logs have tabs separating the key value pairs. Now, nxlog.conf looks like this:
## This is a sample configuration file. See the nxlog reference manual about the
## configuration options. It should be installed locally and is also available
## online at http://nxlog.org/docs/

## Please set the ROOT to the folder your nxlog was installed into,
## otherwise it will not start.

#define ROOT C:\Program Files\nxlog
define ROOT C:\Program Files (x86)\nxlog

Moduledir %ROOT%\modules
CacheDir %ROOT%\data
Pidfile %ROOT%\data\nxlog.pid
SpoolDir %ROOT%\data
LogFile %ROOT%\data\nxlog.log

<Extension _json>
    Module  xm_json
</Extension>

<Extension syslog>
    Module  xm_syslog
</Extension>

<Extension kvp>
	Module xm_kvp
	KVPDelimiter \t
	KVDelimiter =
	EscapeChar \\
	ValueQuoteChar "
</Extension>

<Input in>
#Example reading in a text log file
 Module  im_file
 File 'c:\SomeSoftware\logs\logfile*.txt'
 InputType LineBased
 SavePos TRUE
 PollInterval 1
  <Exec>
	if $raw_event =~ /^#/ drop();
	else
	{
		kvp->parse_kvp();
	}
 </Exec>
 </Input>

<Output resultfile_out>
#This section creates a text-based output file
    Module      om_file
	file		'c:\SomeSoftware\logs\results.csv'
</Output>

<Output out>
    Module      om_udp
	#This is the IP address of the InsightIDR Collector
    Host        192.168.0.46
	#This is the port configured on the Universal Event Source
    Port        10010
</Output>


 <Route 1>
	 Path		 in => out, resultfile_out
</Route>
2a. Remove the extra fields
First, let’s remove all the extra fields in our logs that UEF does not expect. There are a few different ways to do this but, following the path of least resistance, I am going to use the simple delete procedure to remove all the fields from the log entries that I do not want.
I edit <Input> to include the delete, only to realize that I not only need to parse my logs as key value pairs, but I also need to write them back as key value pairs. Oops! A log format must be parsed before the individual parts can be used for processing. My existing <Input> reads them in but does not output them back out, so I need to add in some lines to also output the parsed logs. I currently have an <Extension> for the initial read of the logs called “kvp”. While this might work for my output as well, I create a new <Extension> for the output called “kvp2”. This allows me to use different parameters for KVPDelimiter, KVDelimiter, etc., if I need to.
After some testing, we add <Extension> with the following configuration:
<Extension kvp2>
	Module xm_kvp
#	KVPDelimiter \t
	KVDelimiter =
	EscapeChar \\
	ValueQuoteChar "
</Extension>
Then, we call this new extension in <Input>:
<Input in>
 Module  im_file
 File 'c:\SomeSoftware\logs\logfile*.txt'
 InputType LineBased
 SavePos FALSE
 PollInterval 1
 <Exec>
	if $raw_event =~ /^#/ drop();
	else
	{
		kvp->parse_kvp();
		kvp2->to_kvp();
	}
 </Exec>
 </Input>
Do you see the kvp2 module being used in the else statement? I test this and verify that indeed, I have the input being written out in kvp format. Now I can start deleting fields for real! I add in the delete ($field) procedure and test it. Here is nxlog.conf now:
## This is a sample configuration file. See the nxlog reference manual about the
## configuration options. It should be installed locally and is also available
## online at http://nxlog.org/docs/

## Please set the ROOT to the folder your nxlog was installed into,
## otherwise it will not start.

#define ROOT C:\Program Files\nxlog
define ROOT C:\Program Files (x86)\nxlog

Moduledir %ROOT%\modules
CacheDir %ROOT%\data
Pidfile %ROOT%\data\nxlog.pid
SpoolDir %ROOT%\data
LogFile %ROOT%\data\nxlog.log

<Extension _json>
    Module  xm_json
</Extension>

<Extension syslog>
    Module  xm_syslog
</Extension>

<Extension kvp>
	Module xm_kvp
	KVPDelimiter \t
	KVDelimiter =
	EscapeChar \\
	ValueQuoteChar "
</Extension>

<Extension kvp2>
	Module xm_kvp
#	KVPDelimiter \t
	KVDelimiter =
	EscapeChar \\
	ValueQuoteChar "
</Extension>

<Input in>
 Module  im_file
 File 'c:\SomeSoftware\logs\logfile*.txt'
 InputType LineBased
 SavePos FALSE
 PollInterval 1
 <Exec>
	if $raw_event =~ /^#/ drop();
	else
	{
		kvp->parse_kvp();
		delete($EventReceivedTime);
		delete($SourceModuleName);
		delete($SourceModuleType);
		delete($hostname);
		delete($dst);
		delete($srcPostNAT);
		delete($srcBytes);
		delete($dstBytes);
		delete($role);
		delete($url);
		delete($recordid);
		delete($bwthrottle);
		delete($useragent);
		delete($referer);
		delete($policy);
		delete($urlcategory);
		delete($urlsupercategory);
		delete($urlclass);
		delete($appclass);
		delete($appname);
		delete($generalbrowsing);
		delete($malwaretype);
		delete($malwareclass);
		delete($threatname);
		delete($riskscore);
		delete($filetype);
		delete($appproto);
		delete($dlpdict);
		delete($dlpeng);
		delete($fileclass);
		delete($filename);
		delete($reqmethod);
		delete($respcode);
		kvp2->to_kvp();
	}
 </Exec>
 </Input>

<Output resultfile_out>
#This section creates a text-based output file
    Module      om_file
	file		'c:\SomeSoftware\logs\results.csv'
</Output>

<Output out>
    Module      om_udp
	#This is the IP address of the InsightIDR Collector
    Host        192.168.0.46
	#This is the port configured on the Universal Event Source
    Port        10010
</Output>


 <Route 1>
	 Path		 in => out, resultfile_out
</Route>
My results file contains:
TimeStamp=2018-09-24T10:25:31Z;src=36.7.19.12;realm=CracklingBean;usrName=jfrost;
As you can see, all the extra fields have been removed.
2b. Rename fields
Now, we need to alter some of the key names. UEF expects “time”, not “timestamp”, and wants “source_ip” instead of “src”. After reviewing the original log, we also need to alter “realm” to “authentication_target”, and “usrName” to “account”. After reviewing the NXLog documentation, I decide to use the rename_field procedure to rename the fields as desired.
We can add these lines between the kvp->parse_kvp() and kvp2->to_kvp() lines:
rename_field('TimeStamp', 'time');
		rename_field('src', 'source_ip');
		rename_field('realm', 'authentication_target');
		rename_field('usrName', 'account');
Our results file then shows:
time=2018-09-24T10:25:31Z;source_ip=36.7.19.12;authentication_target=CracklingBean;account=jfrost;
We’re getting closer! It’s time for the next step.
2c. Add additional fields
We’ll now take care of the fields required by UEF but are not currently in our logs: version, event_type, and authentication_result. Version and event_type are literal strings, so I will define them in my config.json file using simple definitions. Authentication_result is a bit more complicated. Your logs will be different than mine, but my device has a “policy” field that we’ll use for authentication_result. If policy=allowed, then authentication_result=SUCCESS. If policy=blocked, then authentication_result=FAILURE. Otherwise, I want the whole log dropped.
I start by defining $version and $event_type and adding those fields to the logs. This section gets added to the bottom of my else statement:
	$version = "v1";
		$event_type = "INGRESS_AUTHENTICATION";
		$raw_event = $raw_event + "version=" + $version + ";" + "event_type=" + $event_type + ";";
After testing this change and verifying that it works as I hope, I then tackle adding the authentication_result field. The section for it is as follows:
if ($policy == "Allowed")  { $authentication_result = "SUCCESS"; } \
			else if ($policy == "Blocked") { $authentication_result = "FAILURE"; } \
			else drop();
I add this section into the <Input> block right after the parse_kvp line. I now have all the fields that I need with no extra ones in the results log.
time=2018-09-28T18:25:31Z;source_ip=36.7.19.12;authentication_target=CracklingBean;account=jfrost;authentication_result=SUCCESS;version=v1;event_type=INGRESS_AUTHENTICATION;
time=2018-09-28T18:26:31Z;source_ip=71.64.8.111;authentication_target=CracklingBean;account=mbolo;authentication_result=FAILURE;version=v1;event_type=INGRESS_AUTHENTICATION;
I also verify that any logs where policy is not Blocked or Allowed have been dropped.
2d. Convert the “TIME” field to ISO 8601 Extended format
In my logs, Timestamp is already in ISO 8601 Extended format, so no further work is required. If your log is not, be sure to format the “time” field, as it’s required for UEF. Details on how to do this can be found at the bottom of this post.
2e. Convert to JSON
Now that we’ve carefully configured our nxlog.conf file, we need our results converted into JSON format. We suggest the to_json procedure for this—add this to the bottom of your <Input> block.
The final config.json file used here is at the bottom of this post.
I run a test and verify that my results file shows the logs in JSON format:
{"time":"2018-09-29T01:25:31Z","source_ip":"36.7.19.12","authentication_target":"CracklingBean","account":"jfrost","authentication_result":"SUCCESS","version":"v1","event_type":"INGRESS_AUTHENTICATION"}
{"time":"2018-09-29T01:26:31Z","source_ip":"71.64.8.111","authentication_target":"CracklingBean","account":"mbolo","authentication_result":"FAILURE","version":"v1","event_type":"INGRESS_AUTHENTICATION"}
Yeah! My logs are now transformed, and I can move on to the final section: sending these logs to InsightIDR.
3. Send the logs to InsightIDR
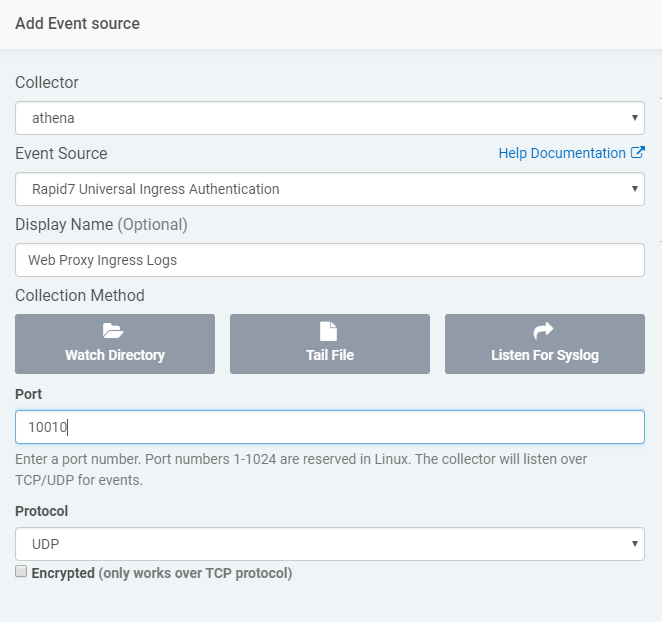
Now that the logs appear to be in the proper UEF format, I will add it into InsightIDR. Earlier, we chose forwarding the logs from NXLog via syslog over UDP port 10010, and that is defined in nxlog.conf. Now I just need to log in to InsightIDR and add this event source.
Let’s ensure that our transformed logs are arriving at the collector. Verify that the NXLog service is running and forwarding logs, then click on “View Raw Log” on the event source to verify that the logs I am sending are there. Once they’re there, the last thing you need to do is verify parsing.
3a. Verify parsing
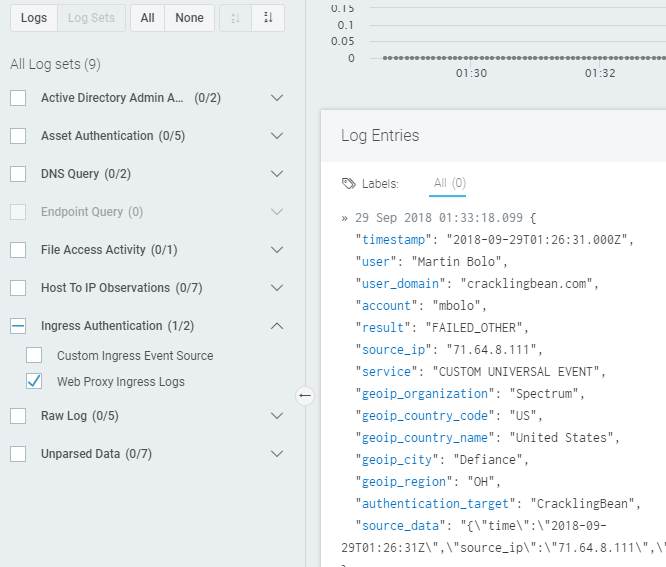
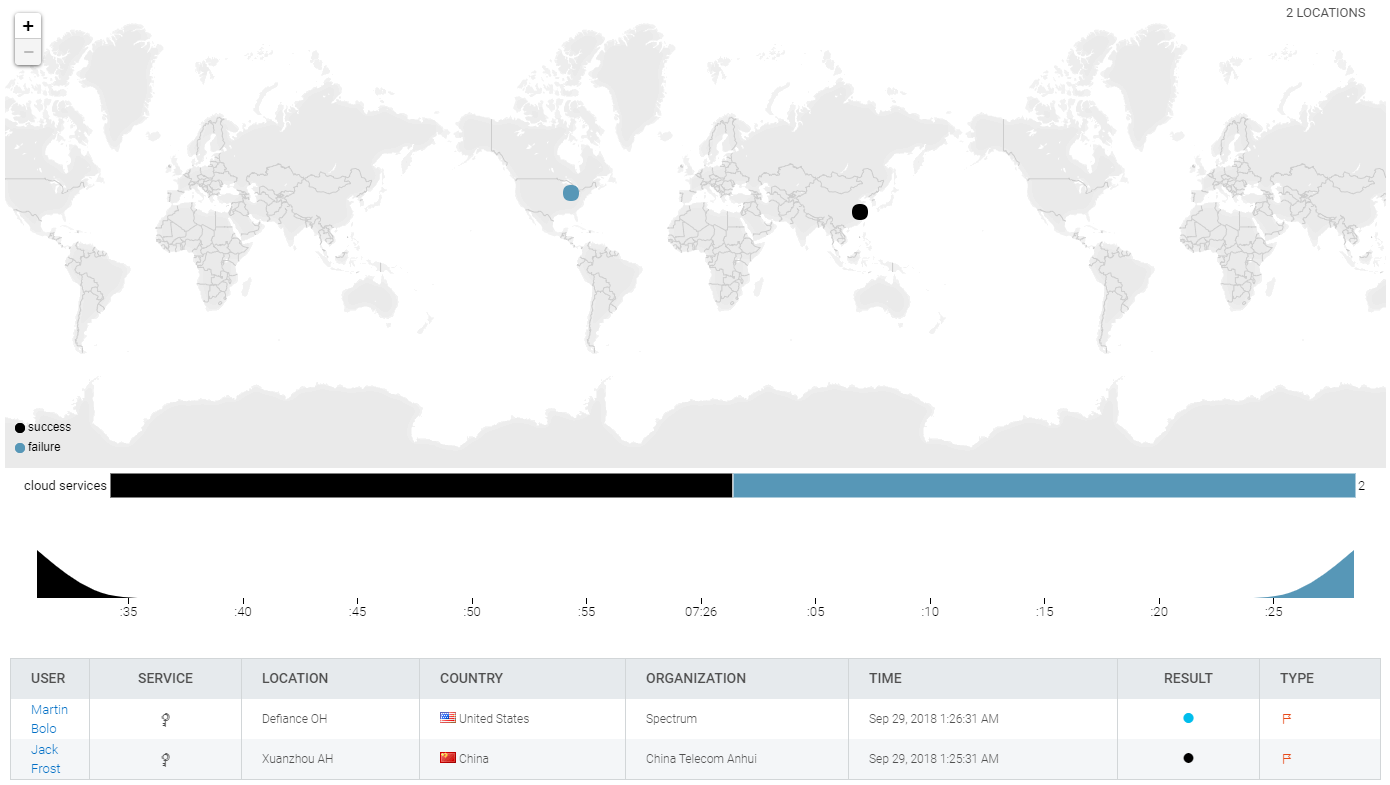
An easy way to check is to head over to Log Search and check for your new event source. If it’s not there as expected, this typically means that the logs aren’t matching our log parsing rules. In our example, if I don’t see the event source appear under Ingress Authentication, I would go back and review the format of the transformed logs, comparing them against UEF. However, after waiting for the slight delay for the logs to be processed and ordered, I can see them in Log Search.
I also see these events on the InsightIDR Ingress Map as expected.
That concludes our example transformation guide of converting a raw log into a Universal Event Format readable by InsightIDR for log search, user attribution, and detection of anomalous behavior. If you’re going through this process and would like assistance, reach out to your Customer Success Manager or Quick Start contact—we want InsightIDR to provide as much visibility into your environment as possible.
Below are a few supplemental steps for if you need to format User Accounts or convert time into ISO 8601.
Supplemental: Format user accounts
In my sample logs, my user accounts were all simple account names, such as jsmith. What do you do if your user accounts are specified in a more complex format?
I tested some additional samples and had no parsing issues with some common user account formats. Unless your user account field contains some crazy formats, you probably do not need to do anything special to parse this field.
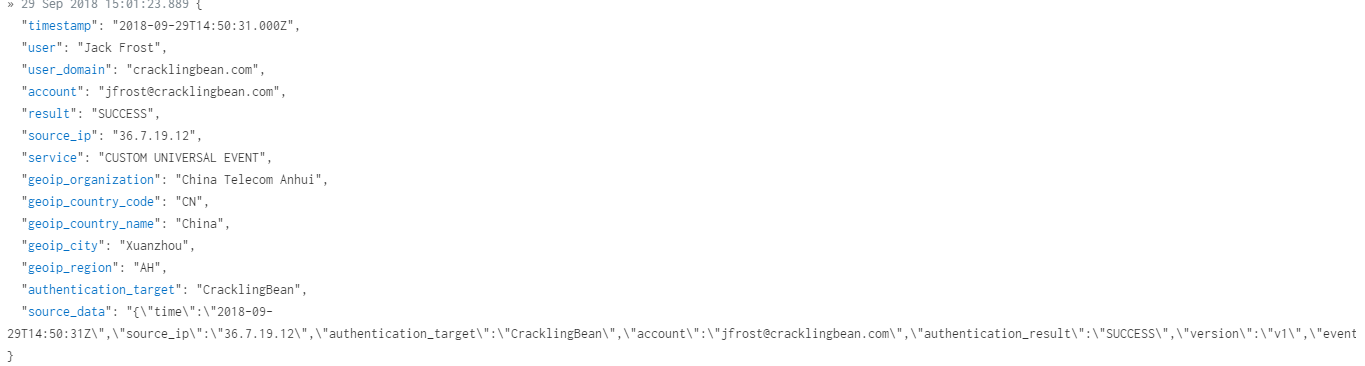
If the user account is not an account, but a full username, such as John Smith, the logs were parsed properly:

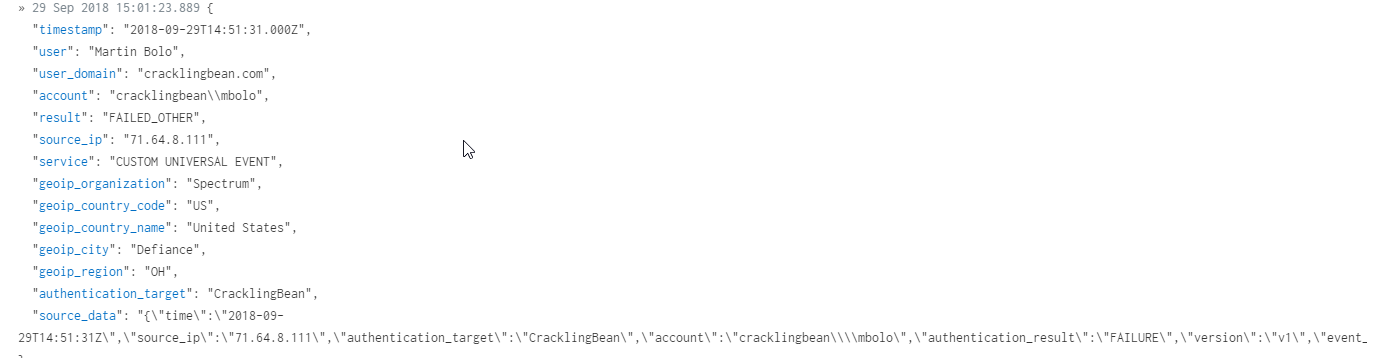
If the user account is in the format of domain\username, the logs were collected and the authentication properly attributed. However, the account shows an extra “\” in the account field. To fix this, regular expression in nxlog.conf can extract it. However, since the attribution is correct, and the username field properly displayed, I have left the log as is.
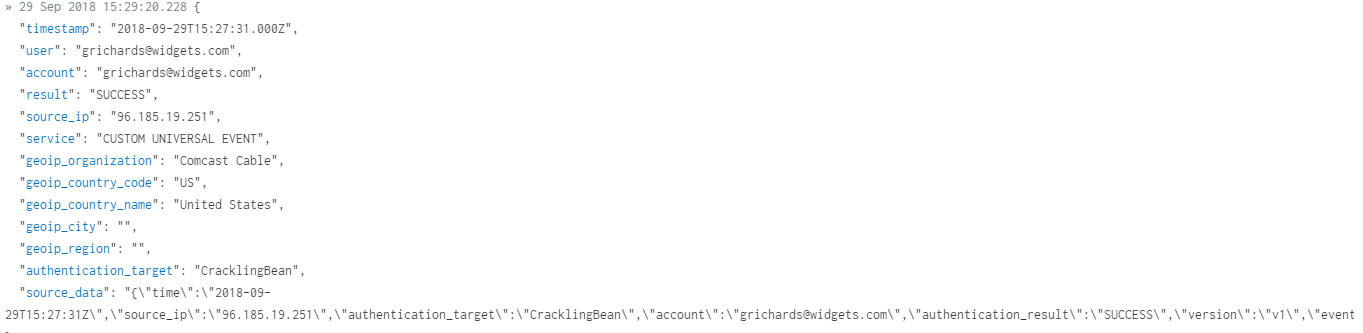
If the user account is specified in UPN format such as user@domain.com, this is also properly parsed and attributed.
If the user is not a valid user in your organization, the logs are still parsed and placed in Log Search.
Supplemental: Convert Time to ISO 8601 Extended
My log sample happily contained logs that were already in ISO 8601 Extended format. If you are trying to get your head around this time format, check out this documentation.
However, what should you do if you are not so fortunate and your time stamp field is in a different format, or, as sometimes is the case, just missing altogether?
The answers to these questions can be complex and varied. In this introductory guide, I propose the simplest solution to this problem. (Be sure to also reference “Adjusting Timestamps” in the “NXLog User Guide” for more.)
The easiest method to deal with messy date/time formats in the source logs is to use the $EventReceivedTime field instead of the original log timestamp. This clearly has the advantage of a single source for “time”, which will then also be in a standard format that you can easily deal with in NXLog. Most of the time, $EventReceivedTime will also be the log generation time, give or take a few seconds, so this method sacrifices little or nothing in the way of accuracy. However, if the source time in your logs is quite different than $EventReceivedTime, consider a different method for parsing time. In other words, if your sending device is not sending the logs to NXLog as soon as they are generated, this method may not work for you.
Before deleting $EventReceivedTime from the parsed logs, you should set $EventTime equal to it:
$EventTime = $EventReceivedTime;
In my original log sample where $Timestamp is already in ISO 8601 Extended format, I am using $Timestamp as the date/time and renaming “Timestamp” to “time”. This is because “time” is the field that UEF expects to see. Well, you do not need $Timestamp in this case as you’re using $EventReceivedTime instead. Therefore, add a line to delete $Timestamp.
We need to format $EventTime so that is in the proper ISO 8601 extended format. If you’re familiar with the function strftime, you might wonder why I don’t use it for a simpler ISO 8601 Extended conversion. Unfortunately, if you run strftime on a Windows system, the %z option does not work. If you have no idea what I am referring to, count your blessings and keep reading. Basically, if you attempt to use the strftime function on a Windows host, you may have trouble getting the time converted from local time to UTC time.
I am going to use this line to convert $EventTime into the correct UEF format for time:
$EventTime = strftime($EventTime, '%Y-%m-%dT%H:%M:%SZ');
There is one problem with this: This method will not convert local time to UTC time. ISO 8601 Extended format is UTC time—that is, UEF expects the logs to arrive having been converted to UTC time. The best way to deal with this is to set the time zone of the host running NXLog to UTC time. That way, $EventReceivedTime is already UTC time, and no further conversion is necessary.
If this is not possible, you can do a manual conversion in NXLog by adding time to $EventTime. For example, my server running NXLog CE is in Mountain Standard Time. UTC time is six hours ahead of MST, or +0600. We can convert MST time to UTC time with this line:
$EventTime = $EventTime + (6 * 3600);
Unfortunately, this does not take Daylight Savings Time into consideration. Programmatically resolving this issue is beyond this introductory document. Therefore, I can either live with this or manually adjust nxlog.conf twice per year.