Last updated at Fri, 15 Dec 2023 00:28:34 GMT
When it comes to securing IoT devices, it’s important to know that Universal Asynchronous Receiver Transmitter (UART) ports are often the keys to the kingdom for device analysis when you have physical access. For example, as part of ongoing security research and testing projects on embedded technology we own, I have opened up a number of devices and discovered a majority of them having UART enabled. Those with UART enabled have—in every case—provided a path to full root access and allowed me to extract the firmware from those devices. It is also important to note, with UART access it is possible to conduct further running state testing for vulnerabilities and other methods for remote exploitation of the device.
How to Gain UART Access to IoT Devices
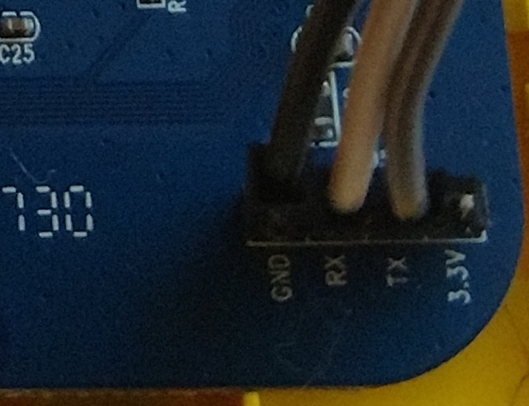
With that said, let’s explore the basics of gaining UART access to an embedded device. The first step when trying to gain access to a UART console is to identify where on the circuit board the three connections needed are located (RX TX GND). To do this, you will need to examine the printed circuit board (PCB) closely for any open headers, and if needed solder in header pins to make it easier to attach the test equipment. Typically these headers are 2.54mm pitch size, but you may also encounter the smaller 1.27mm headers. Worst case scenario, there are no headers exposed and you may have to trace back from the processor’s UART to a point on the circuit board and solder wires directly to some component or pad on the PCB. That said, sometimes you’ll get lucky, and the product vendor is nice enough to properly mark the circuit board with the UART header as shown below in Figure 1.
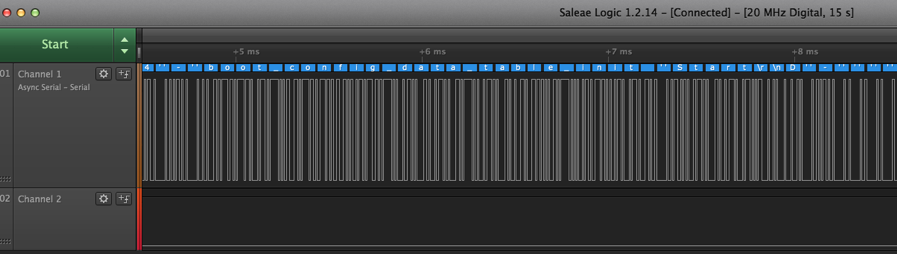
Besides the obvious example shown above, my second favorite method is leveraging a logic analyzer, such as a Saleae product. A good logic analyzer allows you to connect to multiple header pins and use protocol decoding for the activity you are attempting to analyze, in this case asynchronous serial. (Figure 2).
Saleae’s logic analyzer software “LOGIC” has the ability to sometimes identify the valid baud rate if you use the “Use Autobaud” feature. If it doesn’t work, typically the baud rate for most devices is close to or one of the following:
- 38400
- 57600
- 115200
Once a valid active UART connection is identified and you have the correct baud rate, you can connect to it with a RS232-to-USB product, such as a Shikra by XIPITER, along with a general serial application for your desktop or laptop operating system. I use the Coolterm GUI application on my Macbook Pro or on my Linux VM, but we can also use the standard screen application with the following command:
- screen /dev/ttyUSB0 115200
The Various Levels of UART Access in IoT Devices
So now that we have discussed the basics of identifying a UART console and connecting to it, let us look at the various levels of UART access often encountered. I’ve gotten lucky over the last three months, and have been able to drop directly to a root shell without a password on three out of six devices. This 50/50 win rate is atypical, though, since passwordless root is not typically the norm. At least, I hope it’s not becoming the norm.
The most common method of UART access will typically challenge you for a password to gain full root access, and if you do not know it, you might be stuck there. Before giving up, there are a number of methods to consider. First, does the device have a default password? Check that out by doing a little product recon online or in the user manuals. If that doesn’t work, examine the device’s boot up logs in the console, since you can often find a couple interesting methods for gaining further access. One method I’ve come across allows you to place the device into “failsafe mode” by pressing “f” then the “enter” key at a given point during the device boot up (Figure 3).

Failsafe mode turns out to be single user mode, which provides root level access. Although you will not have network access, with a little work you can often activate network communication or enable USB on the device, which will allow you to offload the firmware from the device for further offline examination. Also at this level you will have access to the shadow file, which contains the root account’s hashed password, which can be extracted and cracked with your preferred password cracker.
Another well-documented method is U-Boot console. During system boot you may be prompted “Hit any key to stop autoboot” as shown below in Figure 4.

This will place you in the U-Boot console. From the U-Boot console there are many methods to rewriting the boot process to gain further access. Some of these methods include directly overwriting the root password, enabling a new TTY shell console, and forcing the device into single user mode. If you’re at this point, you only need to do a little experimentation, and most likely you will find a way to the next level.
The Bottom Line
What does all this mean? Simple: If you have UART enabled and functioning on your embedded device, then a persistent individual with physical access and time will nearly always find a way to compromise the device and gain access to the firmware via the UART connection.
So who should even care? This is a valid question, and when talking with manufacturers I like to ask the following question:
- Do you consider the firmware installed on this device to be your proprietary intellectual property?
For the most part, each vendor answers “yes” to this question. If the firmware is important to protect, the easiest and cheapest solution is to disable UART prior to going to market with your product. Unless you’re intentionally encouraging users of your product to offload and alter your firmware, there is rarely any reason to leave it active in a production product. UART access serves no purpose other than to give easy access to your firmware, or more precisely, your intellectual property, to anyone who has physical access to the device.