Last updated at Wed, 07 Feb 2024 19:06:52 GMT
Note: This is the first post in a three-part series on all of the cool stuff you can do with Metasploit Pro. Looking to fast forward? You can access Part 2 and Part 3 now.
Server Message Block, or SMB, is an application protocol that is normally used to share files or printers and other devices. When combined with DCE/RPC, SMB can even give you remote control of a Windows machine over a network. It is also a protocol that is highly dangerous if not properly defended, as shown by a series of high-profile attacks that cost billions of dollars in damages (e.g., WannaCry, SMBLoris, Not-Petya, other attacks exploiting EternalBlue).
Protecting SMB is a serious business, but it can be difficult and time-consuming. So today, we thought we’d share some tips on how to use Metasploit—specifically Metasploit Pro—to save time and money to evaluate SMB services periodically within your organization, autopwn style.
A bit of background for those who missed the good old days of Metasploit: We used to have a feature called db_autopwn whose purpose was to allow the user to attack a target automatically. Sounds really cool, right? Well, except that most of the time, it caused servers to blow up because it was so noisy and inaccurate. Eventually, the Metasploit team removed db_autopwn.
The spirit of db_autopwn lives on in Metasploit Pro, however—but better. First, you can use the Vulnerability Validation Wizard to verify InsightVM/Nexpose findings by actually exploiting them. In addition, Task Chains lets you schedule a sequence of tasks, which can be used to re-evaluate the same vulnerabilities in case they pop up again on your network. Let’s talk about how to do this with Task Chains for SMB.
There are many attack vectors a malicious user could try against SMB. The most popular method, perhaps surprisingly, is not to use an exploit. Instead, everybody’s favorite tactic is bruteforcing passwords. Why? Passwords are low-hanging fruit, people tend to reuse them, and logging in does not risk any denial-of-service. So this should be one of the first things you watch out for.
Getting Started with Task Chains in Metasploit Pro
To set up a Task Chain for auditing passwords, follow these steps:
- Do an Nmap scan and find all the SMB services that are up and running at the time.
- Bruteforce against the SMB services for stolen or weak passwords.
- Create a credential report about it.
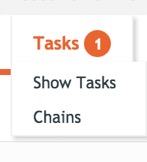
The Task Chains feature can be found in Pro’s workspace. It’s the last button next to Exports:

When you click on Tasks, the menu should expand. The Chains option is what you want:
Task 1: Set up the NMAP Scan
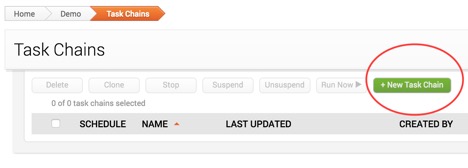
You should be looking at the Task Chains view. Let’s go ahead and create the password audit for SMB. First, click on green New Task Chain button:
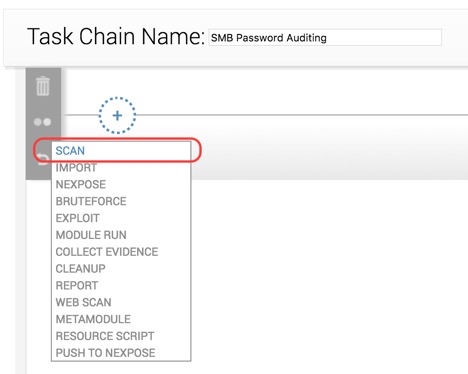
Next, pick a name for your Task Chain. In my case, I’ll call it “SMB Password Auditing”. Then click on the plus sign to assign the first task of the chain, and choose Scan, like this:
The Scan task has quite a lot of settings you can specify. For SMB auditing, it is recommended that you at least do the following:
● Set the address range you want to scan.
● Set the custom TCP port range to 445.
● Uncheck all the discovery settings to save time.
And we’re done configuring this task. Let’s move on to the next one.
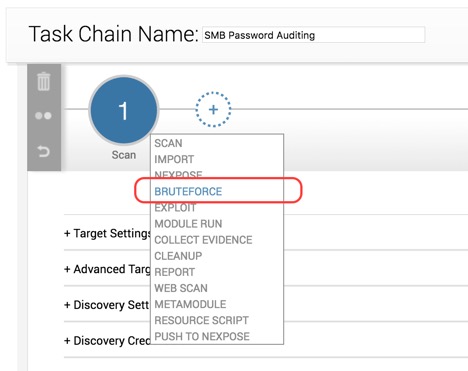
Task 2: Set up SMB Bruteforcing
To create our next task, click on the plus sign again, and then select the Bruteforce option as follows:
The Bruteforce view is broken down into three sections: Targets, Credentials, and Options. Let’s start with Targets, which should be configured this way:
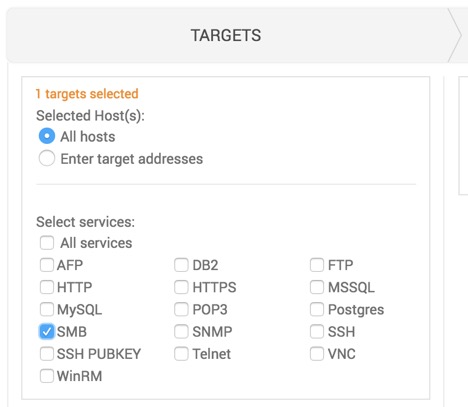
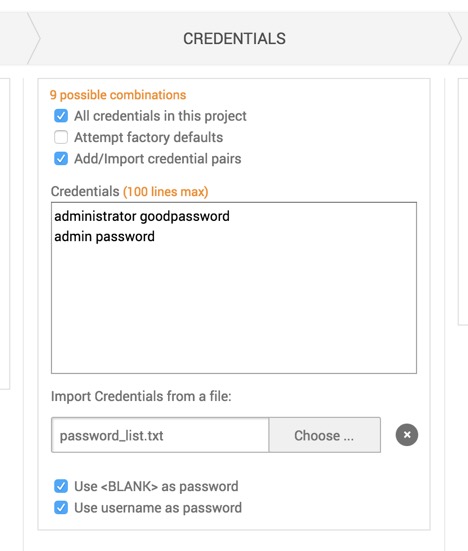
For the Credentials section, ideally you want to at least try all the stolen passwords that you know of, either from a previous pentest engagement, or from a public list (sorry to say). If the current workspace already has some stolen passwords, that’s a good source to try. If not, try to import them from a list. If you’re not aware of any stolen ones, you should focus on the common ones. At the end, your configuration will probably look similar to this:
The Options portion is mostly for adjusting the timing of the bruteforce. But if you need further validation, you can also try to get a session if a password is found.
When you are done configuring the Bruteforce task, click on the plus sign again, and create another new task that reports the findings.
Task 3: Generating a Credential Report
At the end of the Task Chain, it makes sense to generate a report to learn how many services can be easily broken into by just using a compromised password so you can take appropriate actions.
The ideal report type in this case is the Credential report. When choosing this, you will also be offered additional options such as the report’s file format and sections. These should be pretty self-explanatory, so we’ll leave those configurations to you.
The Report function also has a handy email feature. If you wish to send the report to other people on the team automatically, go ahead and check that as well.
Scheduling the Task Chain
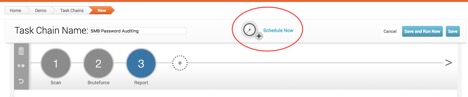
The last step we need to do is actually set a timer for the task chain. If you scroll up on the page, you should see the Schedule Now button:
Click on this icon, and you should see a pop-up that prompts you to set up the time:
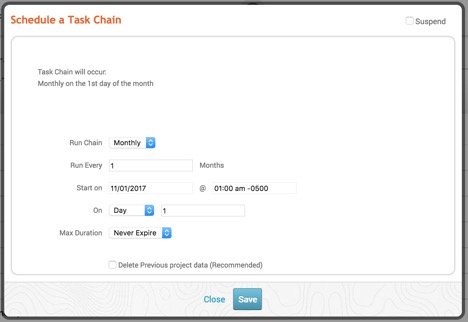
How often this Task Chain runs is completely up to you. Just keep in mind that the time password testing takes to complete will depend on a number of variables, including:
● The number of accounts to try
● The number of SMB services
● The number of passwords
● Network speed
For this reason, it’s best to ensure you don’t let the task chain run again too soon.
Saving the Task Chain
Now that we are done configuring the Task Chain to test password security for SMB, let’s save it. The Save button is located here:

After the Task Chain is saved, it’s good to go! Now you have an automated process that will find all of your stolen or weak SMB passwords across the network, so you can stay productive doing something else.
Although stolen passwords are something you should always be watching out for, they aren’t the only way to break into the network, and there are plenty more chains you can set up. In our next blog post, we will talk about how to apply our custom resource script on Metasploit Pro’s Task Chains to automatically find SMB services that are exploitable to some of the publicly-known high-profile attacks.
If you are a current Metasploit Pro user, we hope you’ve found this useful. For those who have never tried Pro, you’re missing out! You can download a free 30-day trial of Metasploit Pro here.
Want to be notified whenever we post Metasploit content on the blog? Add the Metasploit tag to your RSS feed.
