Last updated at Mon, 08 May 2023 20:37:23 GMT

Systems of all kinds create log data constantly and voluminously. In searching out the most compelling reasons to dig into and analyze such data, we compiled a list of seven reasons that usually drive such activity. In this blog post we tackle the first of those 7, which include:
- System troubleshooting
- Security incident response
- Security troubleshooting
- Performance troubleshooting
- Understanding user behavior or activities
- Compliance with security policies
- Compliance with audit or regulation
Thus, today’s topic is Log Analysis for System Troubleshooting, just as it says in the title.
What Is System Troubleshooting?
In general, troubleshooting a system means trying to get from one or more symptoms of misbehavior to a root cause, and from there to usable a fix or a workaround. System troubleshooting is most often invoked in response to observations or reports of something not working correctly (or at all), or in response to outright error or alert messages (often in concert with sounds to grab users’ attention). There’s a standard general approach to troubleshooting that’s always worth recalling (and following) whenever trouble rears its vexing head. Even when working with log analysis during the process, it’s wise to heed and remember the standard sequence. Please notice that log analysis does not come in until the second step (or later) in the sequence!
CompTIA’s standard troubleshooting sequence in six steps comes from its A+ Computer Technician certification training and materials, but is worth noting and applying whenever appropriate. Here goes:
- Identify the problem: Question the user (or make observations) and identify user (or other) changes to the system. Perform backups before making any changes.
- Formulate a theory of probable cause: Find a likely reason for the problem, and remember to question obvious reasons. Avoid jumping to conclusions.
- **Test the theory to determine cause: **Take whatever steps are necessary to confirm or deny the probable cause. If the theory is confirmed, determine next steps to problem resolution. If theory is denied, return to Step 2. Multiple returns to Step 2 may mean a return to Step 1 is needed instead (the problem may have been mis-identified).
- Plan, then act: Create a plan of action to resolve the problem, document the plan, then implement the planned solution.
- Test and prevent: Check and verify full or normal system functionality, and document results obtained. If verified, proceed to step 6. If applicable, implement preventive measures to prevent a recurrence. If the solution is not verified or correct, return to Step 2.
- Report: Document findings, actions, and outcomes. If multiple passes through steps 1-6 prove necessary, keep track of those activities to make sure you don’t get stuck in a loop where you repeat the same mistakes over and over again.
The most effective troubleshooting proceeds from a clear understanding of normal or expected system behavior, and careful observation of what’s not working, missing, or otherwise abnormal or unexpected. Often, the “find a likely reason” element in Step 2 will come from a careful examination of system log data to see what kinds of errors, warning, and alerts they might contain.
What Kinds of Log Data Helps with System Troubleshooting?
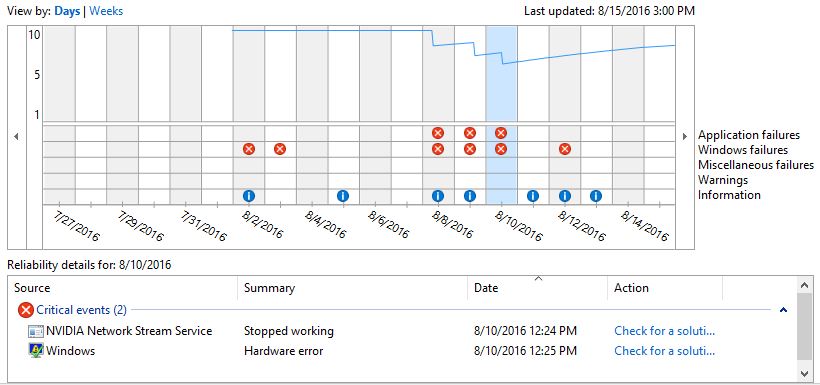
The most obvious or helpful log data often comes from error messages or alerts, often from system or application logs. Thus, for example, troubleshooting a USB problem on a Windows computer might turn to the Event Viewer with a look into the System log. On the other hand, issues related to logging in or failing to create a remote login session will be better sought in the Application log. For most issues, a quick trip to the Reliability Monitor can also be helpful, because it flags issues with both hardware and software aspects of systems. This proved helpful when chasing down a recent USB issue, for example.
In most cases, you will have to formulate at least some idea of likely causes to know where to start looking for related or illuminating information. If your guesses turn out to be off the mark, your initial theory is probably off the mark, too.
Putting the Troubleshooting Puzzle Pieces Together
When it comes to formulating (and checking) theories about problem causation, there are plenty of ways to go looking for clues. If you have a rough idea what time the error occurred, you can use time information in event logs to zero in on the occurrence(s) of interest. It’s seldom necessary to go back more than a minute or two before the recorded or associated time to get a strong sense of root causes, and this really helps to zero in on how much log data needs inspection for subsequent analysis.
The same thing goes for error codes or messages. In more or less the same ways you can scope filters down by timestamps, you can also look for specific codes or message text. Even in the absence of those incredibly informative details, you can filter events by their severity. Thus, for Windows Events, that means you often need to check only the Error and Warning event levels to see the important stuff you’re probably after.
By performing various kinds of event correlation — based on time, error level, systems or applications involved, and so forth — you can limit your searches and focus on the things that are most likely to shed light on the problem at hand. Because you will usually also find sufficient detail to help you identify causes, and usually also, to determine fixes (replace the failing USB hub, in our case) or workarounds (remove the failing USB hub, if a replacement isn’t handy) to keep things working properly.