Last updated at Wed, 06 Dec 2017 20:57:37 GMT
Synopsis:
If you want to increase your privacy or perform security research with Tor, Privoxy, etc. a virtual server is an excellent choice. I’m using Amazon EC2 which provides a years worth of a VM with limited resources for free. A few benefits are listed below
- Low cost
- Access from just about anywhere
- Low resource allocation
- Easy to spin up
Creating the Cloud Instance:
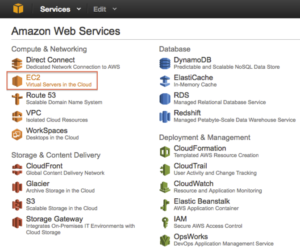
After logging into your Amazon cloud account select an EC2 host from the Web Services list:
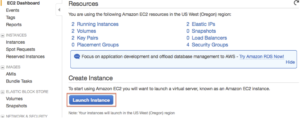
Choose Launch Instance:
This article is written for Ubuntu but you can choose your preference.

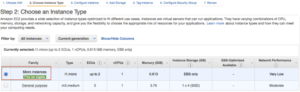
Choose the free Micro instance.
Click Next on “Step 3: Configure Details”, the defaults are fine.
The default 8GB is fine since we won’t be writing much to disk on the machine, mainly passing traffic.

Choose a name for the instance, we’ll call the instance Proxy.

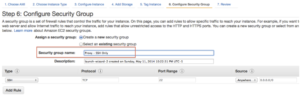
Change the Security Group name to be more descriptive. All we need is SSH for this article (everything will be tunneled over SSH).
Select Launch, copy the DNS name or IP address, and then download your SSH key so that you can authenticate to the instance.

Service Configuration:
Install Privoxy and Tor with your package manager:
$ sudo apt-get install tor privoxy
Set privoxy to listen on the localhost address:
 $ grep ^listen /etc/privoxy/config
 listen-address localhost:8118
If you would like Privoxy to forward its traffic to Tor configure the forward parameter:
grep ^forward-socks /etc/privoxy/config
forward-socks5 / 127.0.0.1:9050 .
Security and SSH TCP Forwarding:
The goal is to be able to use the proxy services without have to share them with the rest of the world. IP source address rules are problematic when traveling and don’t solve the problem of being able to access from anywhere in a convenient way (e.g. adding the current IP through Amazon Management Console at every location).
SSH Tunneling will solve this problem by allowing us to send traffic to each of the proxy services without making them accessible to the world by requiring existing authentication from SSH.
Make sure the proxy services are listening on the loopback address only:
 $ sudo ss -n -p state listening src 127.0.0.1
 Netid Recv-Q Send-Q Local Address:Port Peer Address:Port
 tcp 0 128 127.0.0.1:8118 *:* users:(("privoxy",6043,4))
 tcp 0 128 127.0.0.1:9050 *:* users:(("tor",5564,7))
AllowTCPForwarding is enabled by default in most distributions. If you need to manually set it then add the following line and restart sshd. This allows us to forward non-SSH TCP traffic through our SSH session.
 $ grep AllowTcp /etc/ssh/sshd_config
 AllowTcpForwarding yes
 sudo service ssh restart
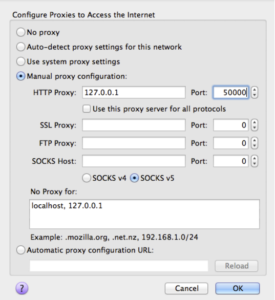
Now, let’s connect to the EC2 instance. We’ll authenticate with the SSH key ( -i ), and create a tunnel between TCP port 50000 on my local machine to TCP port 8118 on the loopback address of the EC2 server. Also, put ssh into the background ( -f ) and do not allow execution of remote commands ( -N )
ssh ubuntu@ec2-blah.amazonaws.com -i .ssh/Amazon-Proxy.pem.txt -L50000:localhost:8118 -f -N
We can see the local socket created on our client machine.
 $ netstat -an -f inet -L
 Current listen queue sizes (qlen/incqlen/maxqlen)
 Listen Local Address
 0/0/128 127.0.0.1.50000
Let’s send some data to it to see if it responds:
 $ telnet localhost 50000
 Trying ::1...
 Connected to localhost.
 Escape character is '^]'.
 /
 HTTP/1.1 400: Invalid header received from client
 Proxy-Agent: Privoxy 3.0.21
 Content-Type: text/plain
 Connection: close

 Invalid header received from client. Connection closed by foreign host.
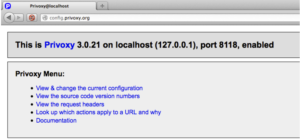
The Privoxy service responded on the other side so let’s configure Firefox to use this newly created socket as an HTTP proxy.
And point your browser to http://config.privoxy.org/to test that Privoxy is working.
You can view or verify the traffic flow to Privoxy on the loopback address of the server using tcpdump:
 $ sudo tcpdump -nni lo port 8118
 tcpdump: verbose output suppressed, use -v or -vv for full protocol decode
 listening on lo, link-type EN10MB (Ethernet), capture size 65535 bytes
 04:06:58.525223 IP 127.0.0.1.57604 > 127.0.0.1.8118: Flags [S], seq 1033960679, win 43690, options [mss 65495,sackOK,TS val 20406668 ecr 0,nop,wscale 7], length 0
 04:06:58.525239 IP 127.0.0.1.8118 > 127.0.0.1.57604: Flags [S.], seq 4082066446, ack 1033960680, win 43690, options [mss 65495,sackOK,TS val 20406668 ecr 20406668,nop,wscale 7], length 0
 04:06:58.525256 IP 127.0.0.1.57604 > 127.0.0.1.8118: Flags [.], ack 1, win 342, options [nop,nop,TS val 20406668 ecr 20406668], length 0
If Privoxy is configured to forward traffic to Tor then you can use a filter to see that it’s making it there.
 $ sudo tcpdump -nni lo port 9050
 tcpdump: verbose output suppressed, use -v or -vv for full protocol decode
 listening on any, link-type LINUX_SLL (Linux cooked), capture size 65535 bytes
 04:20:33.826349 IP 127.0.0.1.56424 > 127.0.0.1.9050: Flags [S], seq 2415794464, win 43690, options [mss 65495,sackOK,TS val 20610494 ecr 0,nop,wscale 7], length 0
 04:20:33.826365 IP 127.0.0.1.9050 > 127.0.0.1.56424: Flags [S.], seq 1671947147, ack 2415794465, win 43690, options [mss 65495,sackOK,TS val 20610494 ecr 20610494,nop,wscale 7], length 0
 04:20:33.826381 IP 127.0.0.1.56424 > 127.0.0.1.9050: Flags [.], ack 1, win 342, options [nop,nop,TS val 20610494 ecr 20610494], length 0
You can edit your SSH client configuration (~/.ssh/config) so that you don’t have to type in that long SSH command to setup the forwarding:
Note: I added a DynamicForward line too which will cause SSH to listen on another TCP port (60000) on the client system so that I can forward traffic from SOCKS-aware applications. With DynamicForwarding a destination port is not needed, it will use whatever is in the TCP Destination Port field.
 Host tunnel
     User ubuntu
     HostName ec2-blah.amazonaws.com
     IdentityFile ~/.ssh/Amazon-Proxy.pem.txt
     LocalForward localhost:50000 localhost:8118
     DynamicForward localhost:60000
With this, the tunnel can simply be created like so:
ssh tunnel
We can verify the local socket are created with the following command
 $ netstat -an -f inet -L
 Current listen queue sizes (qlen/incqlen/maxqlen)
 Listen Local Address
 0/0/128 127.0.0.1.60000
 0/0/128 127.0.0.1.50000