Last updated at Thu, 31 Aug 2017 14:25:16 GMT
Overview
Adaptive Security is a new feature released in Nexpose 6.0 that dynamically collects and analyzes the important network changes with minimal configuration needed from the user. This new feature allows you to create workflows called automated actions that can respond to various behaviors occurring in your environment automatically. For further explanation, please feel free to read Adaptive Security Overview.
Triggers and Actions
Currently Adaptive Security offers 3 triggers:
- New coverage available
- New asset discovered
- Known asset available
Each trigger will be accompanied by an action which handle events that the trigger initiates within a workflow. Following represents a summary of all three triggers and associated available actions:
| Type |
Name |
Configuration parameters |
Description |
|---|---|---|---|
| Trigger | New coverage available | Filter by: CVSS score, risk, severity | Initiates the workflow once a new vulnerability coverage is detected that meets certain criteria defined by filters |
| Action | Scan for new vulnerabilities | An existing Nexpose site | The detected vulnerability is scanned within the selected site. |
| Type |
Name |
Configuration parameters |
Description |
|---|---|---|---|
| Trigger | New asset discovered | Discovery connection | Initiates the workflow once a new asset is discovered from the selected discovery connection. An asset is considered as new if Nexpose has never seen the hostname of the discovered asset before. |
| Action | Add to site and scan | An existing Nexpose site | The detected asset is added to the selected site and scanned. |
| Add to site | An existing Nexpose site | The detected asset is added to the selected site. |
| Type |
Name |
Configuration parameters |
Description |
|---|---|---|---|
| Trigger | Known asset available | Discovery connection | Initiates the workflow once a known asset is discovered from the selected discovery connection. An asset is considered as known if Nexpose has seen the hostname of the discovered asset before. |
| Action | Add to site and scan | An existing Nexpose site | The detected asset is added to the selected site and scanned. |
| Add to site | An existing Nexpose site | The detected asset is added to the selected site. | |
| Tag | Nexpose tag | The detected asset is tagged with the selected tags. | |
| Scan | N/A | The detected asset is scanned with scan template of the site which the asset is located in. |
Let's configure an Automated Action
Let's configure an Automated Action that will initiate a scan when new coverage is available that meets to a certain criteria. In this example, we want to initiate a scan on a specific site when a new coverage which has a risk score of 4 or higher becomes available.
In order to configure the Automated Action, we will use Automated Actions widget. The widget is located on the top right hand corner of Nexpose user interface marked with red square, shown on the screenshot 1:

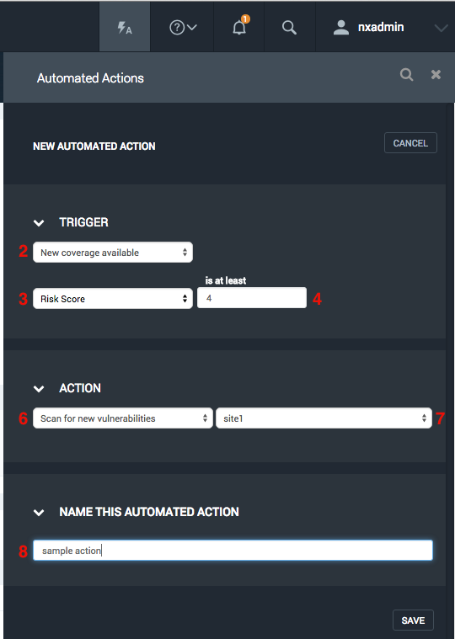
To create a new Automated Action with "New coverage available" as the trigger and "Scan for new vulnerabilities" as the action:
- Click on "NEW ACTION" button marked with green rectangle in the screenshot 1.
- In the drop down menu marked "TRIGGER", select "New coverage available".
- In the "Filter By" drop down menu, pick a criteria, i.e. "Risk Score".
- Enter a valid value in the text box, i.e. 4 is a valid value for "Risk Score" is 0-1000.
- Once a valid value is entered in the text box, the "NEXT" button will become enabled, click on the button to move on to the action selections.
- Choose "Scan for new vulnerabilities" from the "ACTION" drop down menu.
- Once the "Scan for new vulnerabilities" action is chosen, the site selection drop down will appear, choose the desired site and click on the "NEXT" button.
- A text box appears for the name of the action, name the action and click on the "SAVE" button.
Overview of the UI with step numbers from above marked on screenshot 2:
Once the Automated Action is configured and saved, then the trigger will simply wait for respective event to occur in order to kick off the action. The Automated Action will stay enable until you turn if off or delete it all together manually. Currently, there is no process can turn off or delete an Automated Action automatically.
As we continue to develop Adaptive Security, we will be adding additional filters and actions in order to provide better surface area coverage for your needs.
Now, please go ahead and play with this new feature and have fun. As always, we are here to listen any feedback you wish to give.