Last updated at Mon, 24 Jul 2017 19:00:36 GMT
This guide is designed to show you how to determine the cause of and solution to the most common difficulties experienced during asset discovery in Nexpose.
The following common issues will be covered here:
- None or only a few assets are found to be alive
- Scan appears to hang or is taking too long after finding live assets
- Incorrect number of open ports on one or more assets
After reviewing the issue that applies to your scan head down to the end of this guide for detailed troubleshooting steps.
None or only a few assets are found to be alive
In this scenario a scan would typically last for just a few seconds, or even up to a few minutes, and ultimately finds no assets alive. Depending on what results you get from further testing it could be caused by one or more of the following:
- Firewall preventing ICMP or TCP traffic from reaching the destination
- Network bandwidth is saturated during the scan
- High network latency
- Traffic shaping or throttling from an intermediary device
The simplest test at this point is to launch a plain Nmap scan from the system that Nexpose is scanning from, whether it's a security console with a local engine or a distributed scan engine. If you get live hosts and open ports then it is more likely that Nexpose is over-utilizing the network during the discovery phase of the scan. Adjustments can be made in the Discovery Performance section of the scan template to reduce network utilization. If you do not get any live hosts or open ports, then any firewalls implemented between Nexpose and the assets should be configured to allow traffic from the system Nexpose is scanning from.
For detailed troubleshooting steps see the end of this guide.
Scan appears to hang or is taking too long after finding live assets
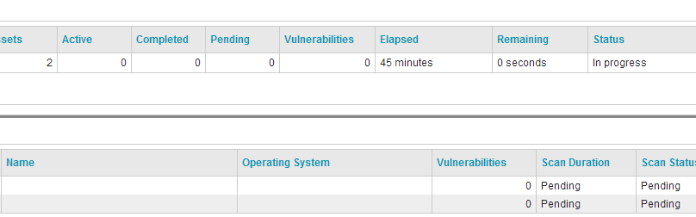
In this situation a scan can be running for many minutes or hours even with a small number of assets to scan. The status for each discovered asset may show a "Pending" status on the scan status page. Typically what's actually happening here is that Nexpose has found the asset(s) to be alive and is continuing with the port scan. Nexpose uses Nmap for the discovery phase and currently it does not output the port scan activity to the scan log; only the summarized results for each asset. Since Nmap performs port scans in groups it will not output the summaries for each asset until the entire group of assets has completed the port scan. When using a scan template that includes all 65,535 TCP ports for service discovery, it can take a significant amount of time to scan and makes this issue more apparent. See the following images for an example of this behavior.
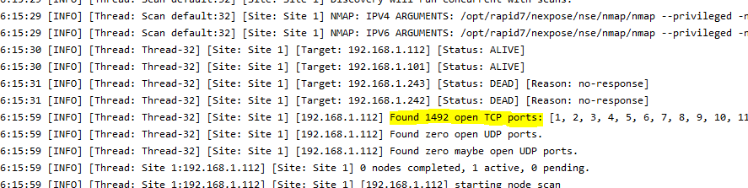
Scan log:

Note the lack of further log activity less than a minute into the scan.
The most common causes are:
- A network security device such as an IDS/IPS is interfering with the port scan
- Assets responding slowly, either due to network conditions or system load
To ensure that Nexpose can properly discover your assets, it should be white-listed on any IDS/IPS devices. For slow responses more testing can be done with Nmap to find the right performance settings for the scan to succeed. In some situations raising the minimum packets per second will speed up the port scan without sacrificing accuracy. In other situations lowering the maximum packets per second may be needed. This will ultimately require some trial and error to find the optimal performance settings for your network.
For detailed troubleshooting steps see the end of this guide.
Incorrect number of open ports on one or more assets
This scenario is not always readily apparent if you don't know to look for it. If you're not using credentials in your scans you might not notice right away that some ports aren't found to be open in some of your scans. Seeing a significant difference in the scan results for similar assets may get your attention, though. In this situation you're very likely to find that each scan finds different open ports for some or all of the assets in the site. You may also find assets that show most or all ports to be open.
This is most commonly caused by:
- Inconsistent network conditions which result in packet loss
- A network security device such as an IDS/IPS is interfering with the port scan
The image below shows what you may find in the scan log with IDS/IPS interference. Click to view full-size.
Similarly to the above section, inconsistent number of open ports can usually be resolved with some trial and error between Nmap tests and Nexpose discovery performance adjustments. As mentioned above as well the system which Nexpose scans from should be white-listed on any IDS/IPS devices in your network.
For detailed troubleshooting steps see the next section.
Detailed Troubleshooting Steps
The following steps assume that you either have Nmap installed on the same system as Nexpose or that you will use the Nmap binary within the Nexpose installation. The tests will be performed from the system where Nexpose is installed. Be sure to test from the right system if you use a distributed scan engine. You should also have the relevant scan log ready as you'll need the Nmap argument parameters to fully test discovery issues. You can download individual scan logs from the scan history of a site in the Nexpose Security Console.
Note: If Nmap is not installed or cannot be installed stand-alone, it can be launched from the Nexpose installation directory. The default locations are:
Linux: /opt/rapid7/nexpose/nse/nmap/nmap
Windows: C:\Program Files\Rapid7\Nexpose\nse\nmap\nmap.exe
You should run Nmap with administrative privileges for these tests. For IP ranges Nmap will accept CIDR format (192.168.1.1/24) or a hyphenated IP range (192.168.1.1-254), but note that the hyphenated format is different from the way Nexpose condenses IP ranges in your site configuration. If you need to include many IP ranges or individual IP addresses that cannot be condensed to an IP range, create a text file containing one IP or IP range on each line. When running the Nmap command add the -iL <filename> option to use the text file. When using hostnames instead of IP addresses please confirm that you can resolve the hostnames to IP addresses from DNS using commands such as dig, nslookup, or even ping.
Hosts not found as alive
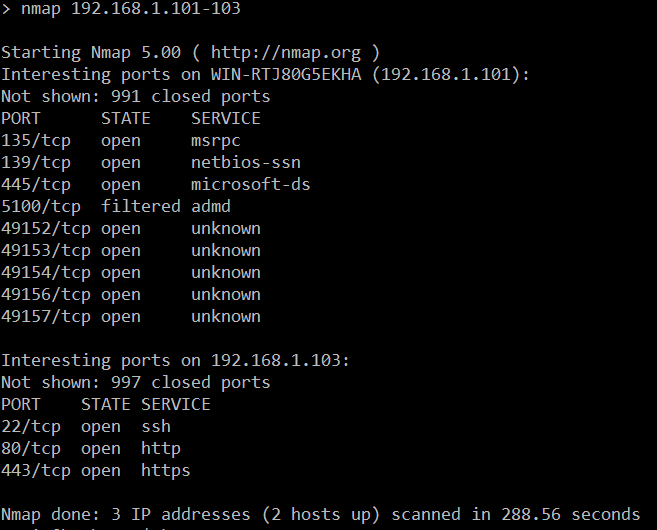
First perform a plain Nmap scan to see if the hosts come back alive at all. If they do you will probably see output similar to the image below. If the hosts do not come back as alive, ensure that your network allows traffic between Nexpose and the scan targets. This may include making configuration changes to a firewall or other network device.
If Nmap has found the hosts to be alive, try running the exact same command a few more times in quick succession. Look for any differences in either hosts found alive or open ports. This usually indicates packet loss or other network interference. You can add the -v option to see more details during the scan.
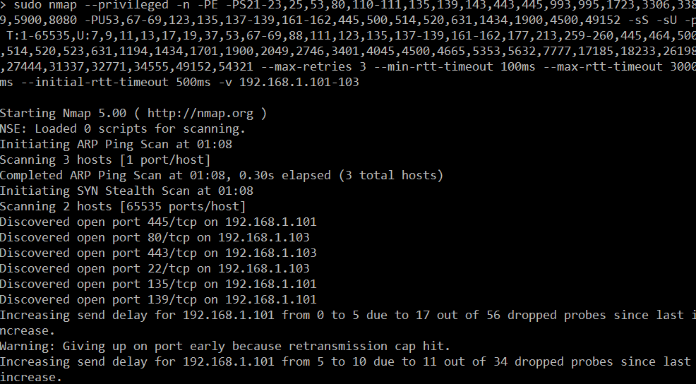
Next, try using the Nmap parameters from your Nexpose scan log so you can reproduce exactly what Nexpose does during discovery. They are usually near the top of the scan log and will look similar to the below image. Click the image to view full-size.

Below you can see the full list of arguments with line wrapping enabled. Note the highlighted items near the end that can be removed from the parameters when you copy and paste to use with Nmap directly. Also note the -v option; you should always include this when running your Nmap tests with Nexpose parameters.

You will still need to include the IP address(es) you're scanning when you copy and paste these parameters. See the notes before this section about specifying IP addresses and IP ranges. With this Nmap scan you should see messages indicating why the host(s) could not be found as alive.
Ultimately you will need to perform more tests with different settings until you get consistent, accurate results. You can tune the discovery performance settings in the Nexpose scan template or adjust some of the numbers in the Nmap parameters you grabbed from the scan log. Minimum and maximum packets per second settings may have the largest effect, so I recommend starting there.
Scan hang or long duration with no further logging
Just as above, simply use the Nmap parameters from your Nexpose scan log and watch the verbose output. Most likely you will see messages about increasing delay on one or more of the scan targets (see the image below for an example). Alternatively the packets per second settings could be set lower than they need to be. Depending on the scan template used in your scan, Nmap may dynamically adjust performance based on perceived network conditions. This is not always perfect and could result in poor performance. Setting the minimum and a maximum packets per second will often speed the up the scan significantly. As before you will have to rely on trial and error to tune your discovery performance settings to get optimal results.
Inconsistent open ports or too many open ports
Conveniently enough the same steps as above apply to this issue as well. If you find the open ports to change with each Nmap scan then you should adjust the following items in discovery performance:
- Maximum Retries
- Scan Delay or Parallelism
- Packets-Per-Second Rate
For reference, here is the approximate bandwidth usage for some Packets-Per-Second Rate settings:
- 1000 pps is about 40kB/s
- 2000 pps is about 80kB/s
- 3000 pps is about 120kB/s
- 5000 pps is about 200kB/s
- 10000 pps is about 400kB/s
Feel free to reply with any questions. If you have a commercial Nexpose license Rapid7 Technical Support will assist you with troubleshooting asset discovery issues.
