Last updated at Wed, 30 Aug 2017 21:10:35 GMT
Rapid7 now offers a Virtual Appliance to get started quickly with Nexpose. You can get started with the Nexpose Enterprise Virtual Appliance or the Nexpose Community Virtual Appliance. If you are an existing customer please contact Support for more information.
The Nexpose Virtual Appliance is pre-configured with the following hardware settings:
- 2 processors
- 8 GB of memory
- 80 GB of hard disk capacity
- 1 network adapter, bridged
While these are the minimum required settings for the Virtual Appliance, you can increase these settings as needed. Refer to your VMWare product documentation for more information on changing these settings. For the rest of this guide we'll assume that you have completed the steps in the Virtual Appliance Deployment Guide to get up and running first. Note that initial startup of the Nexpose service may take some time as updates may be applied on first start.
Here is what we're going to cover:
- Configuring a static IP address
- Setting up SSH access
- Expanding disk storage
- Migrating a Nexpose installation from a physical server to the Virtual Appliance
Be sure to click on the images to view them at full size.
1. Configuring a static IP address
If you've followed the deployment guide you should be able to log into the Linux console through your VMWare virtual display. Once you're logged in enter the following command to edit the network configuration:
sudo nano /etc/network/interfaces
If you are an experienced Linux user you might prefer to use vi to edit this file. For now we'll go with nano since it's easy to use. Currently the interfaces file shows that the network configuration is set for DHCP.
We're going to change the contents to the following (use your own addresses, of course):
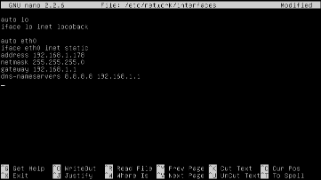
     auto lo

     iface lo inet loopback

     auto eth0

     iface eth0 inet static

     address 192.168.1.178

     netmask 255.255.255.0

     gateway 192.168.1.1

     dns-nameservers 8.8.8.8 192.168.1.1
Press CTRL X and then Y and Enter to exit nano, saving the changes made to the file. Now we need to restart the network interface to use the new settings. Enter the following command:
sudo ifdown eth0 && sudo ifup eth0
This will take the interface down and bring it back up in one step. Running the ifconfig or ip addr command will show the new configuration. You may also need to restart the Nexpose service using sudo /etc/init.d/nexposeconsole.rc restart or simply restart the entire server with sudo shutdown -r now. This will ensure that Nexpose is aware of the networking changes.
2. Setting up SSH access
Now that we have a static IP address, what better way to use it than remote system administration? Plus it's a lot easier to copy and paste into PuTTY or your local terminal than the VMWare console! This step is also going to be super-easy. Just run the following command:
sudo apt-get update && sudo apt-get install ssh
And you'll have SSH going in no time at all with a default configuration. If you need to make changes for security, for example to force key-based authentication, you can use nano to edit the SSH configuration: sudo nano /etc/ssh/sshd_config. Refer to the sshd_config man page for more information. You can access it with the command man sshd_confg.
You can now log into the Virtual Appliance using your favorite SSH client, such as PuTTY or your local Linux or Mac terminal. This will come in handy with migration later on in this guide.
3. Expanding disk storage
For this part we're going to be using the GParted LiveCD ISO image. We'll also need to add a CD-ROM drive to the Virtual Appliance to use it. The Virtual Appliance needs to be shut down to make hardware changes, so enter sudo shutdown -HP now in the terminal. Once the Virtual Appliance is shut down edit the hardware settings to expand disk capacity and add a CD-ROM drive. Point the CD-ROM drive at the GParted LiveCD ISO you downloaded. Make sure that the CD-ROM drive is connected at power on.
When you start up the Virtual Appliance you'll need to press the Escape key quickly at the VMWare BIOS screen. At the boot menu select the CD-ROM Drive option. At the GParted menu press Enter on the first option: GParted Live. When prompted to alter the keymap, choose the default option "do not touch keymap". Select your preferred language and continue to start the graphical interface by selecting 0 at the final prompt. With a disk increase from 80 GB to 120 GB we have the following initial screen in GParted's graphical interface:
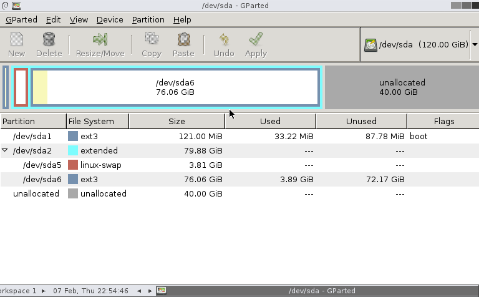
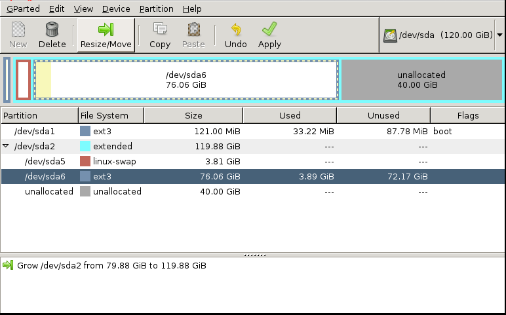
First we need to select the extended partition /dev/sda2 and then click the Resize/Move button.
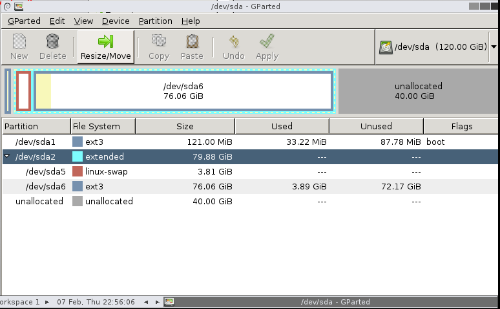
Move the right side of the slider all the way to the right to fill the unallocated space and then click Resize/Move.
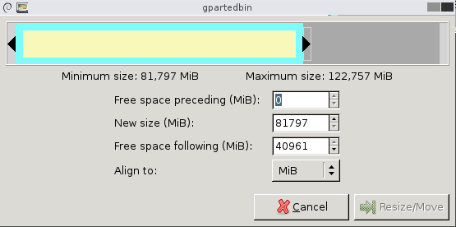
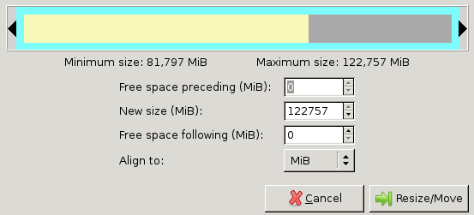
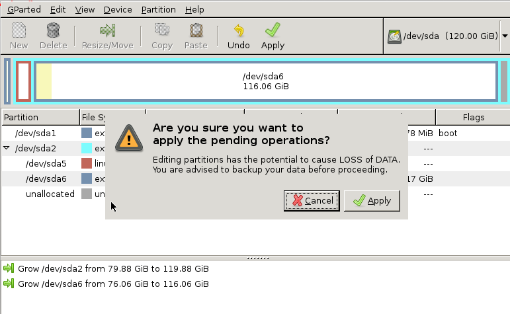
Next we perform the same steps with the ext3 partition /dev/sda6.
After increasing the partition size click the Apply button on the toolbar to finalize the changes.
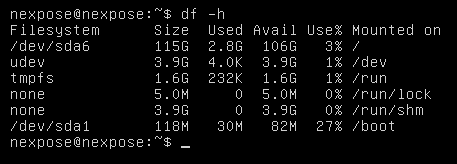
Once the changes are complete you can exit out of GParted and reboot to a normal startup. You can check the new disk capacity after logging into the Linux terminal and entering the following command:
df -h
And you'll see the following output:
Note: If you need to make further changes to the disk capacity after using Nexpose for a while we recommend creating a backup from Nexpose first. Be sure to copy it off of the Virtual Appliance as well. These disk operations are pretty safe, but there is still a risk of data loss. Refer to the Nexpose Help topic: Performing a backup and restore.
4. Migrating a Nexpose installation from a physical server to the Virtual Appliance
For details on the migration process refer to the Nexpose Administrator's Guide, specifically the topic Migrating a backup to a new host. Note: Activation is not required prior to restoring a backup.
Once you've created your platform-independent backup on your original Nexpose Security Console you'll need to copy it over to the Virtual Appliance. If your original Nexpose Security Console is running on Linux you can use the scp command to copy it over SSH. For example, as root on the original server: scp /opt/rapid7/nexpose/nsc/backups/nxbackup_2013_02_07.zip nexpose@192.168.1.178:/home/nexpose/
You'll note in the second part of the command we're specifying the nexpose user at the Virtual Appliance's IP address. We're also specifying the destination path as that user's home directory. We do this because we can't log in as root or use sudo on the Virtual Appliance through scp. Additionally the backups directory doesn't exist until we create it. This means we'll have to move the backup file to the Nexpose backup directory after this is done. On the Virtual Appliance terminal use sudo mkdir /opt/rapid7/nexpose/nsc/backups to create the directory. Then use sudo cp /home/nexpose/nxbackup_2013_02_07.zip /opt/rapid7/nexpose/nsc/backups/ to copy the file.
If you're using Windows you'll need to use WinSCP or a similar application to copy the backup file to the Virtual Appliance. Like scp on Linux, WinSCP can't use sudo so you'll need to copy the backup file to the home directory. Follow the same steps as above to create the backups directory and copy the backup file.
After you've copied the backup it will show up in the Nexpose Backup/Restore page, which you can access by clicking the Administration tab and then clicking the maintenance link for the Maintenance page. Be sure to shut down the original server's Nexpose service to prevent contention with the update server. With the backup restored to the Virtual Appliance you will now have all of your existing Nexpose data, users, and license information active on the Virtual Appliance.
